
Getting a malware lab installed is one thing, but configuring it to be useful is a whole undertaking in itself. One of the first problems we run into when setting up a proper lab environment is simulating the internet. Sure a network will allow each computer to talk to another but what about those pesky URLs, who is going to do all the resolving? It can of course be easily simulated with scripts and custom applications but let me tell you something. As a programmer for the last 20 years the one most annoying thing to have to do is reinvent the wheel. That’s EXACTLY why they have frameworks for these types of things. That being said, to simulate the internet from 4chan to google, I am going to use a framework called InetSim. This collection of applications included can emulate everything from IRC to basic HTTP.
To perform a quick run-time analysis of the network behavior of unknown malware samples, we were in need of a tool to simulate internet services which are commonly used by malware in our laboratory environment. We started off with a bunch of home-grown Perl scripts together with specially configured server service implementations like Apache, Postfix, dnsmasq and ntpd, but we were not happy with this because of a lot of disadvantages resulting from the combination of many programs (e.g. problems with correlation of log data).
While talking to other security analysts, we noticed that there is definitely a need for a comfortable single suite to simulate different internet services with common logging and centralized control functions. So we decided to start the project ‘INetSim’ to develop such a suite.
Nice piece of awesomeness yes? Ok, so now we have to prepare a VM for it to be installed too. Wait… you mean there are VM ready versions of Linux that I can just download and run? Aye there is, and its called TurnKey Linux. TurnKey Linux is great for just these types of projects, it can be downloaded and ran in such short time that all one must really pay attention to is the configuration, which is really, really, really easy. Now the version of Debian Linux that I prefer is Jessie, and unfortunately v 14.0 of TurnKey Linux is in ISO format only. Its ok though, soon it will be available in one of the many other formats that TurnKey Linux is known for so just enjoy the ease of use and install your VM already.
Install TurnKey Linux
- Memory 2GB
- HDD 40GB
- Network Adapter NAT (Will change to our Malware Lab Network after updates and software installs)
- TurnKey Linux Core
 So, once a VM is created and you fill in your specific details, I chose these settings because I wanted some wiggle room to add shared directory space so it seemed like a good idea. It first asks you for a root pw, then for the Hub services API key, I personally skip it since I backup my own stuff but your free to do what you want. They also ask you to sign up for their security updates but im anal about updates so no need to tell me! Same with the auto install of security updates. After that you simply quit the configuration menu are your presented with a login prompt to your newly installed and updated TurnKey Linux box.
One of the reason I like Debian so much is that they usually have some version of software I am going to use in their repository. Now it working is something completely different but hey, at least they try. Knowing that most if not all the dependency’s I was going to need were in the Debian repo it was time to add the INetSim repo and get this beast running!!
nano /etc/apt/sources.list.d/sources.list
and add the following line:
![]()
deb http://www.inetsim.org/debian binary/
Your going to want to install the signature key also so run wget then update Apt-get
wget –O – http://www.inetsim.org/inetsim.org-archive-signing-key.asc | apt-key add –
apt-get update
If everything goes according to plan you simply have to install INetSim now
apt-get install inetsim
That gets her installed but we need to edit some configuration files if we want her to purrrrr. The first thing is that since this box’s sole purpose is to fakes the net, we need to ensure that she starts up on boot.
nano /etc/default/inetsim
That will open up the configuration file, and we need to change ENABLED from 0 to 1.
The next thing we want to do is configure the actual main configuration file to enable services and setup our dns.
nano /etc/inetsim/inetsim.conf
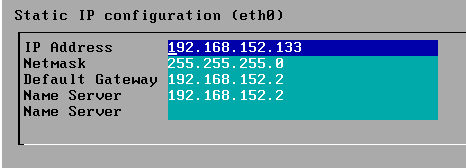
As you can see it has a lot of services turned on, I personally will leave them that way and simply play with our DNS. Our IP Address is local so I want to make sure we bind to it instead of the default localhost to 192.168.197.133.
Next we are going to uncomment the dns_bind_port and dns_default_ip, changing the latter to your static IP.
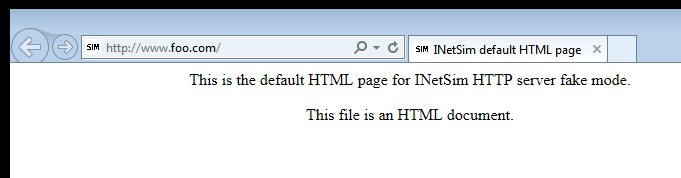
There are tons of things to configure and to go over each one would be crazy, the documentation is available and the system is pretty well commented. So, after its been nice and configured to the way I want her, its time to configure my malware test platforms to talk to her and test it out. If everything is working, and it should be since the system is made to be easily configurable, you can type in www.foo.com and should get a nice simulated internet page.


0 comments